Recipes

Orange Chicken

Ingredients
3-4 boneless skinless chicken breasts, cut into bite-size pieces
1 egg
1 12 teaspoons salt
Pinch freshly ground black pepper
1 tablespoon sesame oil
Oil for frying
12 cup plus 1 tablespoon cornstarch, divided
14 cup flour
3-4 cups broccoli, cut into florets
1 tablespoon ginger, minced
1 tablespoon garlic, minced
12 teaspoon red pepper flakes
1 bunch green onion, chopped
1 tablespoon rice wine (Mirin)
14 cup orange juice
Zest of 1 orange

For Orange Sauce
3 tablespoons soy sauce
3 tablespoons orange juice
12 cup sugar
12 cup rice wine vinegar

Instructions
1. In a large bowl, mix together the egg, salt, pepper, and sesame oil. Mix well. Stir in the chicken pieces.

2. In medium bowl, stir together the flour and 12 cup cornstarch. Add to the chicken pieces, stirring to coat.

3. In a small bowl, combine all sauce ingredients and set aside.  

4. Heat oil for deep frying in a wok over medium-high heat.   Add the chicken, small batches at a time, and fry for 4-5 minutes until browned and crisp. When done remove the chicken from the oil with tongs (or Chinese strainer) and drain on paper towels or in a sieve over a bowl.  

5. Remove all but 1 tablespoon of the oil from the wok.  Heat wok over high heat.  

6. Add broccoli to wok and stir for 2-3 minutes.  Add the ginger and garlic and stir try until fragrant, about 10 seconds.  Add the red pepper flakes and green onions, then the rice wine, stirring for a few seconds.

7. Add the orange sauce and bring to a boil.  Stir the remaining 1 tablespoon of cornstarch into the orange juice, add this mix to the chicken and heat until the sauce has thickened.  If the broccoli is not yet tender, cover the wok during this step to allow the broccoli to steam briefly.  

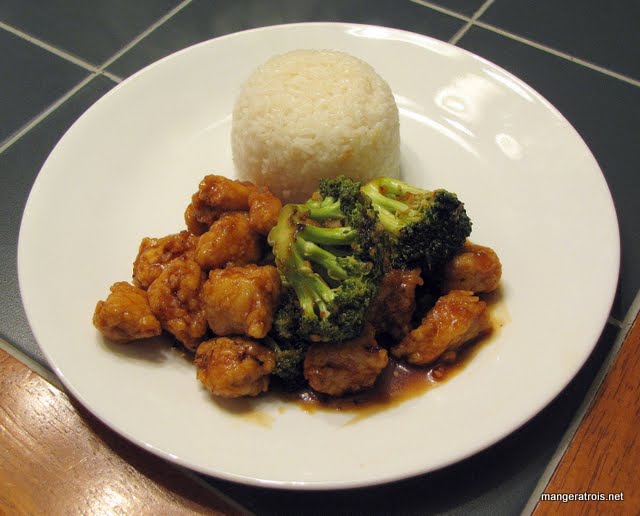
10. Add the cooked chicken to the wok, stirring until well incorporated.  Turn off the heat and stir in the orange zest.  Serve over rice.

Orange Chicken **
Tips for making ahead for a crowd**
Normally I’d avoid a recipe like this for company since my wok is only so large and the recipe involves a lot of time in the kitchen with the frying and everything.  There are steps that you can take to make this for a group. 
_
The day before:_
1. Complete steps 1-3 of the recipe.  I.e., coat the chicken, fry the chicken, and assemble the sauce.  Store the chicken and sauce separately in the fridge. 

2. Cut the broccoli and store it in a container in the fridge. 

3. Mince the ginger and garlic and store them together in a small container in the fridge. 

4. Cut the green onion and store it in a container in the fridge with the red pepper flakes. 

5. Store the orange zest in a container in the fridge. 

6. Mix the cornstarch and orange juice in a container and store in the fridge – you’ll need to stir it at the last minute before adding it. 

To cook:
1. When you’re ready to cook the meal, get the rice going.  Heat oil in the wok over high heat and stir fry the broccoli until tender-crisp, working in batches depending on how much you’ve got.  Place broccoli in large bowl and set aside. 

2. Add a bit more oil to wok and then add ginger and garlic, stirring until fragrant.  Add the green onions and red pepper flakes, stirring for a few seconds before adding the mirin. 

3. Add the orange sauce and bring to a boil – this might take a bit if you’re doubling or tripling the recipe, since you’ll have more sauce.  Stir the juice and cornstarch again and add to the wok.  Stir until thickened. 

4.  Add the chicken from the fridge and stir until coated with sauce and heated through.  Add the chicken and sauce to the bowl with the broccoli, add orange zest, and toss well to combine.  The rice should be ready by now, or close to being ready, and voila.  Easy meal to make when company is over assuming you invest the time the day before to get everything all ready!

Comments
Orange chicken is another dish I’ve never had in a Chinese restaurant.  I’ve heard that it’s not actually very orange-y.  This recipe rectifies that!  I juice the orange after zesting it and, if it doesn’t give me enough juice for the recipe I top it off with some Simply Orange.  This is a fantastic dish and you can easily control the heat level by increasing or reducing the amount of red pepper flakes.  This recipe is one of our many favorites.

I have updated the recipe with make ahead instructions, since it turns out it’s fairly easy to prepare this for a crowd and get almost everything done the day before!

Unknown

Belgian-Style Dipping Sauce

Ingredients
5 tablespoons mayonnaise
3 tablespoons ketchup
1 clove garlic, minced or pressed
12 teaspoon sriracha
14 teaspoon table salt

Instructions
1. Whisk all ingredients together in small bowl and serve with fries. 

Sauce for Fries

Comments
This recipe is from the 2009 Cook’s Illustrated Annual and, since I’m a lover of fries with mayonnaise, I thought it was great!

Shown here with Steak and Bacon Tournedos, Béarnaise Sauce, and French Fries.

Cook’s Illustrated 2009

Easier French Fries

Ingredients
2 12 pounds Yukon gold potatoes, scrubbed, dried, sides squared off, and cut lengthwise into 14-inch by 14-inch batons
6 cups peanut oil
14 cup bacon fat, strained (Optional)
Kosher salt

Instructions
1. Combine potatoes, oil, and bacon fat (if using) in large Dutch oven. Cook over high heat until oil has reached rolling boil, about 5 minutes. Continue to cook, without stirring, until potatoes are limp but exteriors are beginning to firm, about 15 minutes.

2. Using tongs, stir potatoes, gently scraping up any that stick, and continue to cook, stirring occasionally, until crisp and golden, 5 to 10 minutes longer. Using skimmer or slotted spoon, transfer fries to thick paper bag or paper towels. Season with salt and serve immediately.

Fries

Comments
I saw this recipe for the first time about a year ago in a recipe testing email from Cook’s Illustrated and, while it sounded neat, I never got around to testing it.  It was published in the 2009 Cook’s Illustrated Annual and I bookmarked it as something to try in the future.  The future is here and I’m very pleased with how they turned out!  They were nice, thin, crispy and flavorful. 

The usual way to make fries involves frying at one temperature, removing the fries, and then frying at a higher temperature.  This method is different as it relies on the oil being room temperature to begin with.  I’m very pleased with how they turned out.  I think I’d make them slightly thicker next time just for a stronger potato flavor. 

Shown here with Steak and Bacon Tournedos, Béarnaise Sauce, and Belgian-Style Dipping Sauce.

Cook’s Illustrated 2009

Steak and Bacon Tournedos

Ingredients
1 to 1 12-pound beef flank steak
12 pound bacon, sliced thin
1 teaspoon garlic salt
12 teaspoon freshly ground pepper
2 tablespoons fresh parsley, chopped

Instructions
1. Using a meat mallet, pound flank steak to even thickness, about 12-inch thick.  (I’ve skipped this step many times with no ill effects, but it seems to work better with the pounding.)  Sprinkle flank steak with garlic salt and pepper.  Score steak diagonally, making diamond-shaped cuts. 

2. In a large skillet over medium heat, cook bacon until almost crisp.  Remove from skillet and drain. 

3. Sprinkle parsley over flank steak and then top with bacon.  Roll flank steak, starting at the narrow end.  Cut 5 lengths of butcher twine and tie every 1-2 inches, creating 6 even pieces.  Cut between strings to create rounds. 

4. Heat large skillet over medium-high heat.  Place steak rounds in skillet, cut side down, and cook until desired doneness is reached, flipping halfway through.  (5 minutes per side tends to be rare to medium-rare.) 

5. Let rest 5 minutes, remove strings, and serve with Béarnaise Sauce

Tournedos

Comments
This is a family favorite recipe from my mom and one I’ve always loved.  It’s one of the things I look forward to most when the butcher has flank steaks in stock.  The original recipe is definitely a product of its time and calls for meat tenderizer and hollandaise sauce from a packet – I prefer to skip the tenderizer and make Béarnaise Sauce from scratch.  I think that next time I’ll omit the garlic salt and use minced garlic instead, since it was a bit too salty this time around.  Still delicious, though! 

Shown here with French Fries, Béarnaise Sauce, and Belgian-Style Dipping Sauce.

Person - Mom

French Pork and White Bean Casserole (Cassoulet)

Ingredients
Table salt
1 pound dried cannellini beans, rinsed and picked over
2 medium celery ribs
1 bay leaf
4 sprigs fresh thyme
1 12 pounds fresh bratwurst
4 ounces salt pork, rinsed of excess salt and diced
4 tablespoons olive oil
1 12 pounds pork shoulder, cut into 1-inch chunks (I interpreted this as 1 12 pounds of meat which was about a 2 12 pound piece with the bone.)
1 large onion, chopped fine
2 medium carrots, peeled and cut into 14-inch dice, about 1 cup (I used baby carrots.)
8 cloves garlic cloves, minced or pressed
1 tablespoon tomato paste
12 cup dry white wine
1 (14.5 ounce) can diced tomatoes
4 cups chicken broth
Ground black pepper
4 large slices white sandwich bread, torn into rough pieces
12 cup fresh parsley, chopped

Instructions
1. Dissolve 2 tablespoons salt into 3 quarts cold water in large bowl or container. Add beans and soak at room temperature, 8 to 24 hours. Drain and rinse well.

2. Adjust oven rack to lower-middle position and heat oven to 300*F. Using kitchen twine, tie together celery, bay leaf and thyme. Place sausage and salt pork in medium saucepan and add cold water to cover by 1 inch; bring to boil over high heat. Reduce heat to simmer and cook 5 minutes. Transfer sausages to cutting board, allow to cool slightly, then cut into 1-inch pieces. Remove salt pork from water with slotted spoon; set aside.

3. Heat 2 tablespoons oil in large Dutch oven over medium-high heat until beginning to smoke. Add sausage pieces and brown on all sides, 8 to 12 minutes total. Transfer to medium bowl. Add pork shoulder and brown on all sides, 8 to 12 minutes total. Add onion and carrots; cook, stirring constantly, until onion is translucent, about 2 minutes. Add garlic and tomato paste and cook, stirring constantly, until fragrant, 30 seconds. Return sausage to Dutch oven; add white wine, using wooden spoon to scrape browned bits from bottom of pan. Cook until slightly reduced, about 30 seconds. Stir in tomatoes, celery bundle, and reserved salt pork.

4. Stir in broth and beans, pressing beans into even layer. If any beans are completely exposed, add up to 1 cup water to submerge (beans may still break surface of liquid). Increase heat to high and bring to simmer. Cover pot, transfer to oven, and cook until beans are tender, about 1 12 hours. Remove celery bundle. Using large spoon, skim fat from surface and discard. (When I got to this point in the recipe, there was no liquid over the beans so I had no way to skim anything off.)  Season with pepper and stir to submerge beans.  Increase oven temperature to 350*F and bake, uncovered, 20 minutes.

5. Meanwhile, pulse bread and remaining 2 tablespoons oil in food processor until crumbs are no larger than 18 inch, 8 to 10 1-second pulses. Transfer to medium bowl, add parsley, and toss to combine. Season with pepper.

6. Sprinkle 12 cup bread-crumb mixture evenly over casserole; bake, covered, 15 minutes. Remove lid and bake 15 minutes longer. Sprinkle remaining bread-crumb mixture over top of casserole and bake until topping is golden brown, about 30 minutes. Let rest 15 minutes before serving. 

Cassoulet

Comments
This recipe provides a very good example of why it is very important to read the entire recipe before doing a single thing.  This is probably one of the most important skills that any cook can possess.  Reading this recipe through yields two important pieces of information.  The first is that you should soak the beans the night before you plan to cook this recipe.  The second is that the recipe takes a very long time even after the beans are soaked.  I believe that we began prep around 5pm and ate dinner shortly after 9pm.  Four hours including Art’s help with prep.  The last 3 hours of cooking is largely unattended. 

I am very happy to say that all of the time was very worth it.  The beans were perfectly cooked through, the meat was all fantastic, and the dish as a whole was extremely filling and well balanced.  Even though the recipe was time consuming, it wasn’t difficult to bring together.  Lance liked the pieces of pork shoulder most, Art liked the sausage the best, and I liked it all. 

This recipe is from the 2009 Cook’s Illustrated Annual and makes a fantastic meal with a good loaf of crusty bread and salads.

Cook’s Illustrated 2009

Pasta alla Norma Attempt #1

Ingredients
1 large (1 14 to 1 12 pound) eggplant, cut into 12-inch cubes
Kosher salt
4 tablespoons olive oil, divided
4 cloves garlic, minced or pressed
2 anchovy fillets, minced (The ones I bought were rolled around capers, so I minced the capers too.)
14 teaspoon red pepper flakes
1 (28-ounce) can crushed tomatoes
1 pound ziti, rigatoni, or penne
6 tablespoons fresh basil leaves, chopped
3 ounces ricotta salata, French feta, pecorino romano, or cotija, shredded (I used pecorino romano since it was the only one of those cheese I could find in my store.) 

Instructions
1. Toss eggplant with 1 teaspoon salt in medium bowl. Line surface of large microwave-safe plate with double layer of paper towels and lightly spray with nonstick cooking spray. Spread eggplant in even layer over towels; wipe out and reserve bowl. Microwave eggplant on high power, uncovered, until dry to the touch and slightly shriveled, about 10-20 minutes, tossing every 5 minutes to ensure that eggplant cooks evenly. Let cool slightly.

2. Transfer eggplant to now-empty bowl, drizzle with 1 tablespoon olive oil, and toss gently to coat; discard paper towels and reserve plate. Heat 1 tablespoon olive oil in 12-inch nonstick skillet over medium-high until shimmering, but not smoking. Add eggplant and distribute in even layer. Cook, stirring or tossing every 1 12 to 2 minutes (more frequent stirring may cause eggplant pieces to break apart), until well browned and fully tender, about 10 minutes. Remove skillet from heat and transfer eggplant to now-empty plate and set aside.

3. Add remaining 1 tablespoon olive oil, garlic, anchovies, and pepper flakes to now-empty but still-hot skillet and cook using residual heat so garlic doesn’t burn, stirring constantly, until fragrant and garlic becomes pale golden, about 1 minute (if skillet is too cool to cook mixture, set it over medium heat). Add tomatoes, return skillet to burner over medium-high heat, and bring to boil. Reduce heat to medium and simmer, stirring occasionally, until slightly thickened, 8 to 10 minutes.

4. Meanwhile, bring 4 quarts of water to boil. Add pasta and 2 tablespoons salt and cook until al dente. Reserve 12 cup cooking water; drain pasta and transfer back to cooking pot.

5. While pasta is cooking, return eggplant to skillet with tomatoes and gently stir to incorporate. Bring to simmer over medium heat and cook, stirring gently occasionally, until eggplant is heated through and flavors are blended, 3 to 5 minutes. Stir basil and 1 tablespoon olive oil into sauce; season to taste with salt. Add sauce to cooked pasta, adjusting consistency with reserved pasta cooking water so that sauce coats pasta. Serve immediately, sprinkled with cheese. 

Pasta alla Norma

Comments
This recipe is from the 2009 Cook’s Illustrated Annual and, being a lover of eggplant, it seemed like it would be tasty.  As seen by my naming of this, it wasn’t.  There was an extremely off-putting taste in the dish and I’m fairly certain it was due to the cheese, which I stirred into the dish.  Sadly, I can’t judge the taste of the dish aside from this, because it was so overwhelmingly wrong.  If I do make the recipe again in the future, which I hope I will during market season, I will serve the cheese on the side and see if that yields an improvement.

Cook’s Illustrated 2009

Roast Lemon Chicken

Ingredients
1 (3 12- to 4-pound) chicken, backbone removed and butterflied (My chicken was about 5 pounds.)
3 tablespoons lemon zest (From 3 lemons.)
13 cup lemon juice (From same 3 lemons.)
1 teaspoon sugar
Salt and pepper
2 cups chicken broth
1 cup plus 1 tablespoon water
1 teaspoon cornstarch
3 tablespoons unsalted butter
1 tablespoon fresh parsley, finely chopped

Instructions
1. Adjust oven rack to middle position and heat oven to 475*F. Pat chicken dry with paper towels and place in roasting pan. Combine lemon zest, sugar, and 1 teaspoon salt in small bowl. Rub 2 tablespoons zest mixture under skin of chicken at the thighs and breasts. Season chicken with salt and pepper. (Seasoned chicken can be refrigerated for 2 hours.)

2. Whisk broth, 1 cup water, lemon juice, and remaining zest mixture in 4-cup liquid measuring cup, then pour into roasting pan. (Liquid should just reach skin of thighs. If it does not, add enough water to reach skin of thighs.) Roast until skin is golden brown and thigh meat registers 170 to 175*F, 40 to 45 minutes. Transfer to cutting board and let rest 20 minutes.

3. Pour liquid from pan, along with any accumulated chicken juices, into saucepan. (The recipe says you should have 1 12 cups, I had closer to 2 12 cups.)  Skim fat, then cook over medium-high until reduced to 1 cup, about 5-15 minutes. Whisk cornstarch with remaining water in small bowl until no lumps remain, then whisk into saucepan. Simmer until sauce is slightly thickened, about 2 minutes. Off heat, whisk in butter and parsley and season with salt and pepper. Carve chicken and serve, passing sauce at table. 

Half Chicken

Comments
Have I ever mentioned that I love roast chickens?  I do!  And I was scared of them for so long since they just seemed complicated and time consuming!  What a fool I was.  This recipe is from the 2009 Cook’s Country Annual and it’s a bit non-traditional since it involves butterflying the chicken for even cooking.  And it worked!  The lemon flavor was also very powerful in a perfect sort of way.  The sauce was wonderful and the three of us devoured most all of the chicken in one sitting.

Cook’s Country 2009

Slow Cooker Red Beans and Rice

Ingredients
12 pound andouille sausage, cut into thin half moons (I used Aidells.)
1 onion, chopped fine
1 red bell pepper, seeded and chopped fine
1 celery rib, chopped fine (Mine was about 7-8 inches long.)
4 cloves garlic, minced
1 teaspoon dried oregano
12 teaspoon dried thyme
Salt and pepper
5 cups chicken broth
1 pound dried small red beans, rinsed and picked over
1 bay leaf

Instructions
1. Heat sausage in Dutch oven over medium heat until fat renders and sausage is browned, about 8 minutes. Using slotted spoon, transfer to paper towel-lined plate, cover, and reserve in refrigerator. Cook onion, bell pepper, and celery in sausage fat until softened, about 5 minutes. Stir in garlic, oregano, thyme, 1 teaspoon salt, and 12 teaspoon pepper and cook until fragrant, about 30 seconds. Add broth, beans, and bay leaf; bring to low boil, then reduce heat and simmer, covered, until beans are just beginning to soften, about 20 minutes; transfer to slow cooker.  Cover and cook on LOW until beans are completely tender, 4 to 5 hours (or cook on HIGH 3 to 4 hours).  Note: If the beans appear too dry around the last hour of cooking, stir in an extra 12 cup of water. 

2. Remove bay leaf.  Transfer 1 cup bean mixture to food processor and process until very smooth, about 1 minute. Stir pureed beans and reserved sausage into slow cooker, cover, and cook on HIGH until heated through, about 10 minutes. Season with salt and pepper. Serve with rice. 

Note: I processed the onion, red bell pepper, and celery in my food processor, since I was running short on time.  This worked well. 

Red Beans and Rice

Comments
Technically this recipe should just be named “Slow Cooker Red Beans” because it doesn’t include instructions for preparing rice, but I’ll stick with the name the way it is.  My rice cooking method is 2 cups of rice and 4 cups of water in a saucepan, bring to boil, reduce heat to low, cover and cook for 20 minutes.  Works like a charm every time. 

Up until this point, my only experience with Red Beans and Rice has been from the box that says Zatarans.  I’ve never been a fan, it’s entirely too spicy for me even if I dilute it with extra rice.  But Art loves Red Beans and Rice so I figured I would try this recipe out for him and, if it had the same pitfalls as the boxed stuff, I could always eat leftovers. 

Wow, was it tasty!  The texture of the beans was great, they weren’t as broken down as they are in the box sort.  The flavors were spot on as far as I could tell, and the spice level was perfect for me.  Just a little heat but nothing overwhelming.  The true test was Art, since he’s the Red Beans and Rice connoisseur, and he loved it.  I declare this recipe a resounding success and it’s all thanks to the 2009 Cook’s Country Annual.

Cook’s Country 2009

Sour Cream and Onion Smashed Potatoes

Ingredients
2 pounds small red potatoes, scrubbed (Apparently my potatoes weren’t small enough and I ended up wishing that I had used baby potatoes or quartered the ones I did use.) 
4 tablespoons unsalted butter
4 green onions, white parts minced, green parts sliced thin
1 cup sour cream
12 cup half and half
Salt and pepper

Instructions
1. Bring potatoes and enough water to cover by 1 inch to boil in large pot over high heat. Reduce heat to medium and simmer until potatoes are tender, about 30 minutes. (Due to the size of my potatoes this took about 50-60 minutes…)

2. Meanwhile, melt butter in medium saucepan over medium-low heat. Cook green onion whites until translucent, about 5 minutes. Whisk in sour cream, half and half, 1 teaspoon salt, and 14 teaspoon pepper until smooth. Remove from heat, cover, and keep warm.

3. Drain potatoes in colander and return to dry pot; let stand 5 minutes. Using rubber spatula, break potatoes into large chunks. Fold in sour cream mixture until incorporated and only small chunks of potato remain. Stir in green onion greens and season with salt and pepper. Serve. 

Smashed Potatoes

Comments
This recipe is from the 2009 Cook’s Country Annual the flavors were great.  Aside from the large potatoes taking forever to cook, the recipe was very simple to bring together and very tasty.  I love the chunky texture that smashed potatoes have. 

Shown here with Maple-Glazed Pork Tenderloin.

Cook’s Country 2009

Maple-Glazed Pork Tenderloin

Ingredients
34 cup maple syrup (The real stuff, please.)
14 cup light or mild molasses (I used “original” which I guess is mild.)
2 tablespoons bourbon or brandy (I used brandy since that’s what I had in my cabinet.)
18 teaspoon ground cinnamon
Pinch ground cloves
Pinch cayenne pepper
14 cup cornstarch
1 tablespoon table salt
2 teaspoons ground black pepper
2 pork tenderloins
2 tablespoons vegetable oil
1 tablespoon Dijon or whole grain mustard

Instructions
1.Adjust oven rack to middle position and heat oven to 375*F. Stir 12 cup maple syrup, molasses, bourbon, cinnamon, cloves, and cayenne together in 2-cup liquid measure; set aside. Whisk cornstarch, salt, and black pepper in small bowl until combined. Transfer cornstarch mixture to rimmed baking sheet. Pat tenderloins dry with paper towels, then roll in cornstarch mixture until evenly coated on all sides. 

2. Heat oil in 12-inch heavy-bottomed nonstick skillet over medium-high heat until just beginning to smoke. Reduce heat to medium and place both tenderloins in skillet, leaving at least 1 inch in between. Cook until well browned on all sides, 8 to 12 minutes. Transfer tenderloins to wire rack set in rimmed baking sheet. (The tenderloins will shrink some as they cook in the skillet, so don’t worry if you have to curve them to fit them initially.) 

3. Pour off excess fat from skillet and return to medium heat. Add syrup mixture to skillet, scraping up browned bits with wooden spoon, and cook until reduced to 12 cup, about 2 minutes. Transfer 2 tablespoons glaze to small bowl and set aside. Using remaining glaze, brush each tenderloin with approximately 1 tablespoon glaze. Roast until instant-read thermometer inserted in thickest part of tenderloins reads 130*F, 12 to 20 minutes. Brush each tenderloin with another tablespoon glaze and continue to roast until thermometer reads 135 to 140*F, 2 to 4 minutes longer. Remove tenderloins from oven and brush each with remaining glaze; let rest, uncovered, 10 minutes. (I didn’t actually measure the glaze I used each time, since I had plenty.  I just brushed it on until it was, well, glazed each time.)

4. While tenderloins rest, stir remaining 14 cup maple syrup and mustard into reserved 2 tablespoons glaze. Transfer meat to cutting board and slice into 14-inch-thick pieces. Serve, passing mustard glaze at table.

pork tenderloin

Comments
I’ve made many recipes for pork tenderloin over the years but this is, by far, the most flavorful.  The recipe is from the 2009 Cook’s Illustrated Annual and the guys could not stop eating it.  The sauce, which I forgot to add to the plate before taking the picture, was a great compliment.  The tenderloins smelled wonderful while cooking and all the spices just blended together fantastically.  The cornstarch coating helped to add nooks and crannies to the pork so that the glaze would adhere during cooking. 

There is no doubt that I’ll be making this again – there are two other variations in the cookbook that I’m interested in trying at some point. 

Shown here with Sour Cream and Onion Smashed Potatoes (and a thermometer hole and fork print, oops).

Cook’s Illustrated 2009