Recipes

Artichoke and Mushroom Lasagna

Ingredients
Filling
1 tablespoon olive oil
1 pound chicken, cut into small pieces
2 tablespoons butter
1 pound mushrooms, sliced
3 cloves garlic, minced
2 (8 ounces each) packages frozen artichoke hearts, thawed, coarsely chopped
1 cup white wine

Béchamel sauce
4 12 tablespoons butter
4 12 tablespoons all purpose flour
4 12 cups whole milk
2 12 cups Parmesan cheese, grated
Ground nutmeg, to taste
1 9-ounce package oven-ready (no-boil) lasagna noodles
1 pound whole-milk mozzarella cheese, thinly sliced

Instructions
1. For filling: Heat oil over medium-high heat.  Add chicken and cook until done.  Melt butter in skillet, without removing chicken, and add mushrooms and garlic; sauté until mushrooms release juices and begin to brown, about 7-10 minutes. Add artichokes and white wine. Cook until liquid is absorbed, stirring occasionally, about 10 minutes. Season with salt and pepper.

2. For béchamel sauce: Melt butter in heavy medium saucepan over medium-high heat. Add flour; stir 1 minute. Gradually whisk in milk. Reduce heat to medium and simmer until sauce thickens and lightly coats spoon, stirring occasionally, about 20 minutes. Stir in 1 12 cups Parmesan. Season to taste with salt, pepper, and ground nutmeg.

3. Spread 23 cup béchamel sauce over bottom of 13x9x2-inch glass baking dish. Top with 4 noodles. Spread 14 of artichoke mixture over. Spoon 23 cup béchamel sauce over. Top béchamel with 14 of mozzarella.

4. Sprinkle with 3 tablespoons Parmesan. Top with 4 more noodles. Repeat layering until last 4 noodles are placed on top, then spread remaining béchamel over the noodles. Sprinkle with remaining Parmesan. (This can be prepared 1 day ahead. Cover with foil and refrigerate.)

5. Preheat oven to 350°F. Bake lasagna covered with foil 1 hour (or 1 hour 15 minutes if chilled). Remove foil. Increase temperature to 450°F. Bake lasagna until golden on top, about 10 minutes longer.
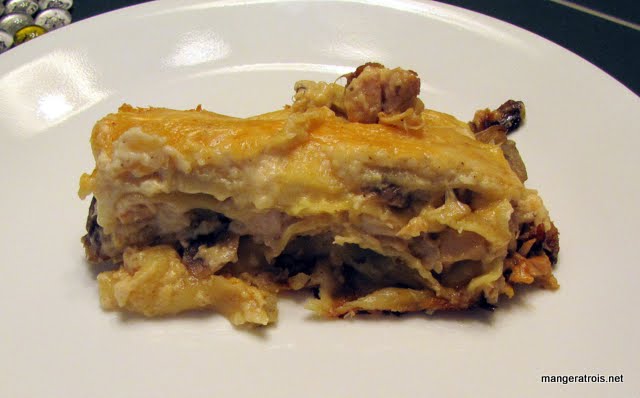
Artichoke Mushroom Lasagna

Comments
This recipe is from Epicurious.com and slightly tweaked to add chicken.  The original is vegetarian and the chicken can easily be omitted.  I found the recipe in my search for non-traditional lasagna and could not have been more pleased.  I made this for Game Day and it was definitely a hit with everyone.  I will certainly be making this again in the future when I want something other than the classic lasagna.

Internet - Epicurious
Tiramisu

Ingredients
2 12 cups strong brewed coffee, room temperature (If you don’t drink coffee, like me, a Venti from Starbucks will do the trick)
1 12 tablespoons Instant espresso granules
6 12 tablespoons Marsala
6 large egg yolks
23 cup sugar
14 teaspoon salt
1 12 pounds mascarpone cheese
34 cup heavy cream
14 ounces ladyfingers (42-60)
3 12 tablespoon Dutch-processed cocoa
14 cup semi-sweet chocolate, grated (optional)

Instructions
1. Stir coffee, espresso, and 2 12 tablespoons marsala in wide bowl or baking dish until espresso dissolves; set aside.

2. In bowl of standing mixer fitted with whisk attachment, beat yolks at low speed until just combined. Add sugar and salt and beat at medium-high speed until pale yellow, 1 12 to 2 minutes, scraping down bowl with rubber spatula once or twice. Add remaining 4 tablespoons marsala and beat at medium speed until just combined 20 to 30 seconds; scrape bowl. Add mascarpone and beat at medium speed until no lumps remain, 30 to 45 seconds, scraping down bowl once or twice. Transfer mixture to large bowl and set aside.

3. In now-empty mixer bowl (no need to clean bowl), beat cream at medium speed until frothy, 1 to 1 12 minutes. Increase speed to high and continue to beat until cream holds stiff peaks, 1 to 1 12 minutes longer. Using rubber spatula, fold one-third of whipped cream into mascarpone mixture to lighten, and then gently fold in remaining whipped cream until no white streaks remain. Set mascarpone mixture aside.

4. Working one at a time, drop half of ladyfingers into coffee mixture, roll, remove, and transfer to 13 by 9-inch glass or ceramic baking dish. (Do not submerge ladyfingers in coffee mixture; entire process should take no longer than 2 to 3 seconds for each cookie.) Arrange soaked cookies in single layer in baking dish, breaking or trimming ladyfingers as needed to fit neatly into dish.

5. Spread half of mascarpone mixture over ladyfingers; use rubber spatula to spread mixture to sides and into corners of dish and smooth surface. Place 2 tablespoons cocoa in fine-mesh strainer and dust cocoa over mascarpone.

6. Repeat dipping and arrangement of ladyfingers; spread remaining mascarpone mixture over ladyfingers and dust with remaining 1 12 tablespoons cocoa. Wipe edges of dish with dry paper towel. Cover with plastic wrap and refrigerate 6 to 24 hours. Sprinkle with grated chocolate, if using; cut into pieces and serve chilled.  
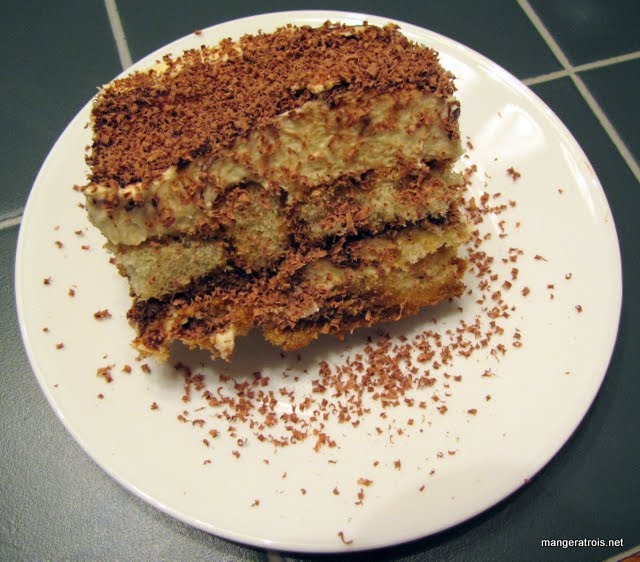
Tiramisu

Comments
This recipe is more the 2007 Cook’s Illustrated Annual and it was amazing.  Art requested that I make Tiramisu and, even though I’ve made it before, it was in a time before I saved all of my recipes.  I had no idea where that original recipe was, so I turned to Cook’s Illustrated for help.  While it didn’t use the standard zabaglione, the flavor was stellar and lack of zabaglione made it infinitely easier to bring together.  I swapped out the rum for marsala but, otherwise, the recipe is unchanged.

Art was pleased.

Cook’s Illustrated 2007

Grilled Jerk Chicken

Ingredients
For jerk marinade
3 green onions, chopped
4 large cloves garlic, chopped
1 small onion, chopped
1 to 4 fresh Scotch bonnets or habanero chiles stemmed and seeded (Art used 2 and it was too spicy for me to comfortably eat.  Use your own judgment and be careful.)
14 cup fresh lime juice
2 tablespoons soy sauce
3 tablespoons olive oil
1 12 tablespoons salt
1 tablespoon brown sugar, packed
1 tablespoon fresh thyme leaves
2 teaspoons ground allspice
2 teaspoons black pepper
34 teaspoon nutmeg, freshly grated
12 teaspoon cinnamon

For chicken
8 boneless, skinless chicken breasts (or other chicken parts that equal 8 servings)

Instructions
1. Make marinade: Blend all marinade ingredients in a blender until smooth.

2. Marinate and grill chicken: Divide Place chicken and marinade in a sealable bag or container.  Stir well and seal. Refrigerate, turning once or twice, for 24 hours.

3. Let chicken stand at room temperature 1 hour before cooking.

4. Heat grill, grill pan, or griddle and grill until chicken is done.  This will vary greatly due to the thickness of the chicken and the heat of your grill so you should check the chicken for doneness before serving.   It tends to take 3-5 minutes per side on our grill when using thinner breasts.  

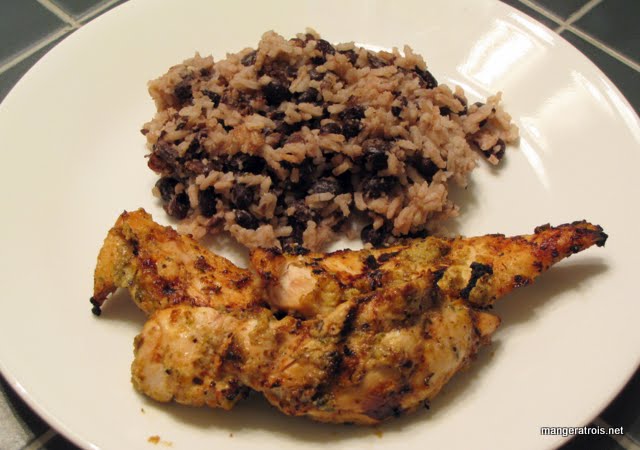
Jerk Chicken

Comments
Art loves Jerk Chicken.  In August, when I was out of town, he made this for himself and loved it.  He’s been wanting to make it for Lance and me every since.  We finally got habaneros from the market so that Art could work his magic.  Before the heat killed me, the flavors of this marinade were delicious.  And then the heat got me and I couldn’t eat anymore.  Sigh.  

Shown here with Rice and Black Beans.

Unknown

Chicken Parmesan Pot Pie

Ingredients
1 pie shell (homemade or store bought)
1 pound boneless, skinless chicken breasts, cubed
2 teaspoons garlic, minced
12 teaspoon salt
12 tablespoon olive oil
1 cup tomatoes, chopped
12 cup fresh parsley, chopped
14 cup fresh basil, chopped
12 cup Parmesan cheese, shredded
1 cup mozzarella cheese, shredded
3 eggs, beaten
34 cup sour cream
2 teaspoons dried oregano
12 teaspoon salt

Topping
2-4 slices sourdough bread, cut into 12” cubes (About 2 cups)
12 tablespoon olive oil
14 teaspoon salt
14 teaspoon pepper
14 teaspoon garlic powder
2 tablespoons Parmesan cheese, shredded

Instructions
1. Preheat oven to 400*F. Spread pie shell in a deep dish pie plate or casserole dish. Bake pie shell for 10 minutes with pie weights or dried beans, if desired. Remove weights or beans and reduce oven temperature to 350*F.

2. Put the chicken in a bowl, add garlic, salt, olive oil and toss. Heat skillet over medium heat, add chicken and cook until done, about 6-10 minutes. Remove from pan.

3. In a medium bowl combine tomatoes, parsley, basil, cheese, eggs, sour cream, oregano, salt and chicken. Stir to mix.

4. Put cubed bread, olive oil, salt, pepper, garlic powder and cheese in a zip-top bag. Seal and shake until all of the bread is coated.

5. Pour chicken mixture into pie crust and top with sourdough bread cubes and cheese. Bake for 45-60 minutes or until a knife inserted in the middle comes out clean. Let rest for 10-15 minutes before serving.

Chicken Parmesan Pot Pie

Comments
I rushed prep for this so it’s not quite as pretty as it usually is.  Sorry about that!  Once upon a time someone on an online forum asked for recipe testers.  Of all the recipes I tried, this was the one that we all deemed a keeper, with quite a few modifications and a rename.  It’s a great, hearty, and filling dish.  We find that it serves four quite nicely, but sometimes the three of us fight over that last piece!

If you’re the creator reading this, I’d love a link to your book so I can add it to the post.

Unknown

Baked Stuffed Mushrooms with Goat Cheese and Thyme

Ingredients
1 slice white sandwich bread, torn into pieces
6 tablespoons olive oil, divided
3 tablespoons garlic, minced, divided (about 9 cloves)
Salt and ground black pepper
24 white mushroom caps, wiped clean and stems removed (1 12 to 2 inches in diameter, they will shrink during cooking)
4 ounces goat cheese, softened
1 teaspoon fresh thyme, minced

Instructions
1. Heat the oven to 300*F. Pulse the bread in a food processor to coarse crumbs, about 6 pulses. Toss crumbs with 1 tablespoon of the oil, 1 tablespoon of the garlic, 18 teaspoon salt, and 18 teaspoon pepper. Spread the crumbs on a rimmed baking sheet and bake, stirring occasionally, until lightly browned and dry, about 15-20 minutes; set aside to cool.

2. Increase the oven temperature to 450*F and line a baking sheet with foil. Mix 4 more tablespoons of the oil with the remaining 2 tablespoons garlic, 14 teaspoon salt, and 18 teaspoon pepper, then toss with mushroom caps. Lay the caps, gill side down, on the prepared baking sheet. Roast the mushrooms until they release their juices, about 20 minutes. Flip the caps over and continue to roast until the liquid has evaporated completely and the mushrooms are brown all over, about 10 minutes longer. Remove the mushrooms from the oven, flip gill side down, and set aside to drain any excess moisture.

3. Line a second baking sheet with foil; set aside. Mix the goat cheese, thyme, and remaining tablespoon oil together until smooth and season with salt and pepper to taste. Transfer the cheese mixture to a small zip-top bag and snip off a corner of the bag using scissors. Pipe about 1 teaspoon of the goat cheese mixture into each mushroom cap and top with bread crumbs. Transfer the stuffed mushrooms to the prepared baking sheet. (I was able to press the filled mushrooms into a bowl with the crumbs without the filling falling out.)  

4. To store: Wrap the baking sheet tightly with plastic wrap and refrigerate for up to 3 days. (If you don’t have room for a baking sheet in your refrigerator, you can stack the stuffed mushrooms inside a casserole dish - one on top of the other - as long as the layers are separated by sheets of parchment paper.)

5. To serve: Adjust an oven rack to the middle position and heat the oven to 450*F. Unwrap the mushrooms and bake until the mushrooms and filling are hot and the crumbs are crisp, about 10 minutes.  

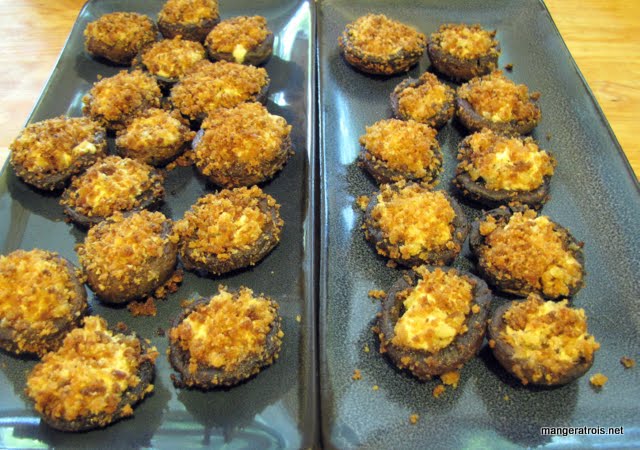
Stuffed Mushrooms

Comments
I love stuffed mushrooms and, when planning a meal to go with Tiramisu, they seemed like a great appetizer.  Since I was making them for Game Day, I found this recipe in The Best Make-Ahead Recipe which is one of America’s Test Kitchen’s fantastic tomes.  Making them the day before worked perfectly, they were delicious when I cooked them the next day and everyone gobbled them up.  I was able to make 25 mushrooms with the ingredients here which were great for an appetizer portion.  If you’re aiming for a light lunch, you might want to increase all the amounts.

The Best Make-Ahead Recipe

BLT Salad with Ranch

Ingredients
12 ounces center cut bacon, cut into small pieces
4 cups French bread, in 1-inch cubes
1 teaspoon dried thyme
4 cups baby arugula
4 cups baby romaine lettuce
4-6 cups tomatoes, cubed
2 tablespoons fresh chives, chopped
12 cup ranch dressing

Instructions
1. Preheat the oven to 350°F.

2. Cook the bacon in a nonstick skillet over medium-low heat until golden brown. Drain on paper towel. Reserve 2 tablespoons of the bacon fat.

3. Toss bread cubes with bacon fat, thyme, salt, and pepper. Spread in a single layer on a rimmed baking sheet and bake until golden, 12-15 minutes, shaking the pan once.

4. Place bacon, croutons, and all remaining ingredients in a large bowl.  Mix well and serve.  

[No photo!]

Comments
I found this recipe on Epicurious.com when I was looking for ways to use up the arugula I got this week in my CSA box.  It’s not that different from the BLT salad I posted previously and it’s still delicious.  The croutons tossed in the bacon fat were a great component.  

Sadly, I have no photo because I managed to cut my finger while cutting the bread.  Wound care trumped photography!

Internet - Epicurious

Deconstructed Winter Squash Ravioli

Ingredients
2 small winter squash, cut into small cubes
Salt and pepper, to taste
Pinch nutmeg
2 tablespoon olive oil
1 pound pasta (I used campanelle)
13 cup fresh sage, chopped
1 stick butter (8 tablespoons)

Instructions
1. Preheat oven to 400*F.  Cover a baking sheet with foil and place the cubed squash on the foil.  Toss with the olive oil, salt and pepper, and nutmeg.  Bake for 20-25 minutes or until the squash is tender.  Remove from oven.  

2. Meanwhile, bring a large pot of salted water to boil and cook pasta as directed on packaging.  Drain well.  

3. Add butter to the empty pot and melt over medium heat.  Stir when butter begins to bubble and continue stirring until it browns.  Add sage and continuing stirring for 30-45 seconds to incorporate.  Remove from heat.  Add pasta and squash to the pot and stir well to combine.  Serve.  

Deconstructed Winter Squash Ravioli

Comments
I love butternut squash ravioli but I can’t find the premade stuff locally and I don’t really have the nerve yet to make homemade ravioli, even though I do have the pasta rolling attachments for my mixer.  The idea for this dish has been bouncing around in my head since I made Browned Butter Pasta with Tatsoi the other day.  Why not just take all the parts of butternut squash ravioli and throw it together in a bowl with browned butter and sage?  

It worked very well!  I think I would have been happier with a bit more squash, I only had about 3 cups total from my two squashes.  This was very delicious and I’m thrilled my experiment worked out nicely.  It’s also pleasant when that happens!

Person - Gwen

Chicken Saltimbocca

Ingredients
12 cup all purpose flour
Ground black pepper, to taste
8 thin boneless, skinless chicken breast cutlets
1 tablespoon fresh sage, minced
8 thin slices prosciutto
4 tablespoon olive oil
1 14 cups white wine
2 teaspoons lemon juice
4 tablespoon unsalted butter, cut into 4 pieces and chilled
1 tablespoon fresh parsley, minced
Salt, to taste

Instructions
1, Adjust oven rack to middle position and heat oven to 200*F. Combine flour and 1 teaspoon pepper in shallow dish.

2. Pat cutlets dry with paper towels. Dredge chicken in flour, shaking off any excess. Lay cutlets flat and sprinkle evenly with minced sage. Place 1 prosciutto slice on top of each cutlet, pressing lightly to adhere; set aside.

3. Heat 2 tablespoons oil in 12-iinch skillet over medium-high heat until beginning to shimmer.  Add half cutlets to pan, prosciutto-side down, and cook until light golden brown, 2 to 3 minutes. Flip and cook on other side until light golden brown, about 2-5 minutes more. Transfer to oven safe plate and keep warm in oven. Repeat with remaining 2 tablespoons oil and cutlets, then transfer to oven to keep warm while preparing sauce.

4. Pour off excess fat from skillet. Stir in wine, scraping up any browned bits, and simmer until reduced to about 13 cup, 5-7 minutes. Stir in lemon juice. Turn heat to low and stir in butter, 1 tablespoon at a time. Remove from heat, stir in parsley and season with salt and pepper. Remove chicken from oven and place on platter. Spoon sauce over cutlets before serving.  

Chicken Saltimbocca

Comments
I’ve been watching old episodes of America’s Test Kitchen recently and I caught the episode where they made this dish.  It looked so delicious and easy so I looked it up in the 2008 Cook’s Illustrated Annual and decided to give it a go.  Wow.  We were so pleased with the results!  What a fantastic, and easy, dish this was!  I can’t wait to make this again.  The prosciutto adhered perfectly so no toothpicks were needed at all.  The chicken was super flavorful and tender.  Yum.

Cook’s Illustrated 2008

Spaghetti Pie

Ingredients
1 pound ground beef
14 teaspoon salt
14 teaspoon black pepper
2 cups tomato sauce (I used leftover Roasted Tomato Sauce #2)
1 12 cups sour cream
12 cup green onions, chopped
14 cup (2 ounces) cream cheese, softened
4 cups pasta, cooked and hot (8 ounces uncooked)
cooking spray
1 13 cups mozzarella cheese, shredded

Instructions
1. Preheat oven to 350*F.  Cook pasta If not already cooked.  

2. Cook meat in large nonstick skillet over medium heat until browned, stirring to crumble. Drain well, and return meat to pan. Stir in salt, pepper, and tomato sauce. Bring to boil; reduce heat, and simmer 20 minutes.

3. Combine sour cream, green onions, and cream cheese in a small bowl and set aside.

4. Place pasta noodles in a 2-quart casserole dish coated with cooking spray. Spread sour cream mixture over pasta. Top with meat mixture. Sprinkle with cheese. Cover and bake for 25 minutes. Uncover, bake an additional 5 minutes or until cheese is bubbly.

Spaghetti Pie

Comments
I believe that this is a traditional potluck dish in the Midwest and, if it’s not, it should be!  It’s similar to Ziti, but uses some unusual ingredients.  Art says that he’s always weirded out by the inclusion of sour cream when he sees the recipe and re-amazed at how delicious it is every time he eats it.  Then he has seconds.  

Any pasta shape would work.  The idea of the dish is that it’s being made with leftovers from a previous night of spaghetti so that you’ll be using leftover cooked noodles and leftover spaghetti sauce.  Since I wasn’t using leftovers, I chose Mezze Rigatoni.  

This is an easy dish to prepare ahead of time and refrigerate (or even freeze) until needed.  Just be sure to adjust the cooking time as necessary to take the starting temperature of the dish into account.

Unknown

Amatriciana Pasta

Ingredients
12 ounces center-cut bacon, cut into small pieces
1 red onion, cut in half and thinly sliced
3 cloves garlic, sliced
1 teaspoon red pepper flakes
2 cups basic tomato sauce
1 pound pasta (I always use Barilla’s Cellentani because it has great nooks and crannies to catch the sauce)
Freshly grated cheese, such as Pecorino Romano, optional

Instructions
1. Bring water to a boil in a large pot and add 2 tablespoons salt.

2. Meanwhile, in a large sauté pan, combine the bacon, onion, garlic, and red pepper flakes; set over medium heat and cook until the onion is softened and the bacon has rendered most of its fat, about 12 minutes.

3. Drain the bacon mixture in a mesh sieve or colander and return to pan. Add the tomato sauce, turn up the heat and bring to a boil, then lower the heat to a simmer and allow to cook for 6 to 7 minutes, stirring occasionally.

4. While the sauce simmers, cook the pasta in the boiling water for about a minute less than the package directions, until still very firm; drain.

5. Add the pasta to the simmering sauce and toss for about 1 minute to coat. Serve topped with cheese, if desired.  

Amatriciana Pasta

Comments
This recipe is one of the many I’ve tried, and loved, from Mario Batali’s fantastic Molto Italiano.  I’ve tweaked it only slightly to take into account availability of ingredients.  When I serve this pasta, people frequently forget that there are other things on the plate to go with it because the pasta is that awesome.  I think that I could safely say it is my family’s favorite pasta dish.  It’s also a ridiculously simple way to doctor up store-bought pasta sauce and turn it into something amazing.  I usually just use a jar of Safeway-brand Marinara sauce if I haven’t got any basic homemade sauce on hand.  

Shown here with Italian Style Meatloaf.

Molto Italiano