Recipes

Szechwan Eggplant and Pork Stir-Fry

Ingredients
1 pound lean ground pork
2 pounds eggplant (I didn’t have enough eggplant, so I added in zucchini as well)
3 tablespoons peanut oil
1 tablespoon sesame oil
Kosher salt and freshly ground black pepper
1 bunch green onions, thinly sliced
1-inch piece fresh ginger, peeled and minced
3 cloves garlic, minced
1 dried red chile, thinly sliced
1 cup chicken broth
6 tablespoons soy sauce
2 tablespoons rice vinegar
2 tablespoons light brown sugar
2 tablespoons cornstarch
2 tablespoons toasted sesame seeds, for garnish
Cilantro, for garnish, optional

Instructions
1. Cut the eggplants in 12 lengthwise and then slice crosswise into wedges, no more than 1-inch wide.  (If you have particularly large eggplants, cut into quarters lengthwise.)   

2. Heat a wok or large skillet over medium-high flame and add the pork.  Break pieces up with a wooden spoon and sauté until cooked through.  Remove from skillet, drain, and set aside.  

3.  Add the oils to the wok or skillet and heat over medium-high flame; tilt the pan to coat all sides. When oil is hot, add a layer of eggplant, stir-fry until seared and sticky, about 5-10 minutes. Season with salt and pepper. Remove the eggplant to a side platter and cook the remaining eggplant in same manner, adding more oil, if needed.  (I recommend using a large skillet so that you can fit all of the eggplant in one batch, otherwise you risk it becoming too oily.)  

4. After all the eggplant is out of the pan, add the green onions, ginger, garlic, and chile; stir-fry for a minute until fragrant. Add the broth. In a small bowl, mix the soy sauce, vinegar, sugar, and cornstarch until the sugar and cornstarch are dissolved. Pour the soy sauce mixture into the wok and cook another minute, until the sauce has thickened. Put the pork and eggplant back in the pan, tossing quickly, until the sauce is absorbed. Garnish with sesame seeds and cilantro, if desired.  Serve over rice.  

Scechwan Eggplant

Comments
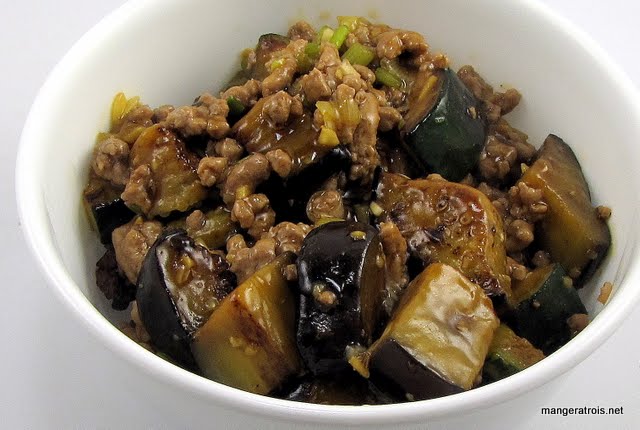
This recipe is from Tyler Florence of Food Network fame.  Art always says that Tyler reminds him of Elvis.  I have no idea why, but there you have it.  I added the pork to the recipe to make it a complete dinner for us and used some zucchini along with the eggplant.  Art and I both enjoyed this dish quite a bit.  It was very rich and flavorful, perfect for a cold night before choir practice.

Internet - Food TV

Slow Cooker Roast Chicken with Crispy Skin

Ingredients
1 whole chicken, giblets removed (I have a round 5-quart slow cooker and I can just manage to fit a 7 pound chicken into it.)
2-3 tablespoons seasoning of choice (I’m a fan of McCormick’s Low-Sodium Montreal Chicken.)

Instructions
1. Tear off two pieces of heavy duty aluminum foil, about 3 feet long.  Fold each piece in half lengthwise and press into the slow cooker to form a sling.  The ends of the aluminum foil should hang over the sides of the pot.  

Chicken in Pot

2. Season chicken well, inside and out.  Place chicken breast side up in slow cooker on top of foil sling, cover, and cook on LOW for 6-7 hours.  

3. Preheat oven to 500*F.  Remove chicken from slow cooker using the foil sling and place on rimmed baking sheet.  

Chicken pre-roasting

4. When oven is preheated, roast chicken for 20 minutes or until the skin is nice and crispy.  

5. Remove from oven and allow to rest for 10-15 minutes before carving.  

Chicken post-roasting

Comments
I’ve roasted chicken in the slow cooker many, many times and have always been thrilled with the results.  However, the skin is never crispy like you’d get with an oven roasted chicken.  Finishing the chicken in the oven seemed like a great plan, but whenever I cook a chicken in the slow cooker it’s always falling apart and would be impossible to move to the oven for further cooking!   

Inspiration hit in the form of aluminum foil.  Placing the chicken in a sling in the pot makes removing it from the crock a very simple task and, from there, it’s a quick 20 minute roast to crisp up the skin.  We were all very thrilled with the results.  Nice crispy skin and no hassle roasting in the pot.  

Make sure to save, boil, and strain all the delicious juices that accumulate in the bottom of your slow cooker.  They make a fantastic soup base!  If you’re home during cooking, you can pour the liquid out at the 3-4 hour mark.  The foil sling is helpful with this part as well.

Person - Gwen

Chilled Sesame-Ginger Tatsoi

Ingredients
14 cup rice wine vinegar
4 dashes Sriracha
Black pepper, to taste
2 tablespoons sugar
Salt, to taste
2 tablespoons sesame oil
1 12 pounds tatsoi, washed and dried
13 cup soy sauce
1 tablespoon ginger, minced
Sesame seeds, for garnish

Instructions
1. Bring a large pot of salted water to a rolling boil. Add the tatsoi, blanch for I minute, drain, immediately plunge into ice water to stop the cooking process, and drain again.

2. In a small bowl, combine the soy sauce, sesame oil, ginger, sugar, vinegar and sriracha. Mix well, and season to taste with salt and pepper.

3. In a large bowl, combine the tatsoi and dressing, and mix well.  Refrigerate until well chilled, garnish with sesame seeds and serve.

Chilled Sesame-Ginger Tatsoi

Comments
This recipe is from eCuisine.org and was delicious!  Be careful with the sriracha if you’re not a lover of spicy foods, I think I might have used a smidgen too much for my liking, but all the other flavors were great.  The last time I made Tatsoi we were a bit disappointed by the bitterness of the leaves.  This recipe takes care of that nicely by blanching in salted water; there wasn’t even a trace of the bitterness we experience before.  In a way, this reminded me a lot of seaweed salad that you get in Japanese restaurants.

Shown here with Soy-Ginger Salmon.

Internet - eCuisine

Soba with Chicken and Peanut Sauce

Ingredients
3-4 boneless, skinless chicken breasts, cut lengthwise into thin strips
1 pound soba noodles
12 cucumber, cut lengthwise into thin strips
23 cup creamy peanut butter (I use Safeway brand natural)
14 cup soy sauce
1 tablespoon sesame oil
2 teaspoons Chinese chile garlic paste
14 cup green onions, chopped
Sesame seeds, for garnish

Instructions
1. Bring a large pot of salted water to boil over high heat.  Add chicken to pot and cook, stirring, until cooked through, 1 to 2 minutes.  Transfer chicken to a bowl using a slotted spoon.  

2. Return water to boil and then cook noodles as directed on packaging, about 4 minutes.  Reserve 34 cup of the cooking water and then drain noodles in colander.  Rinse under cold water to stop cooking and drain well.  

3. Meanwhile, whisk together peanut butter, soy sauce, sesame oil, chile paste, and reserved cooking water until smooth.  

4. Add noodles, cucumber, dressing and green onions to bowl with chicken.  Toss well and serve with sesame seeds.  

Soba with Chicken and Peanut Sauce

Comments
This recipe is from epicurious.com.  I served it warm but I believe it would also work as a cold dish.  It was very simple to make and extremely flavorful.  It would be simple to add more vegetables if you had them on hand.  Sadly my store didn’t have Soba, so I used Somen instead.  Those worked well although Soba would be even better.  Make sure not to overcook the noodles.  

Shown here with Chilled Sesame-Ginger Tatsoi.

Internet - Epicurious

Amazing Italian Lemon Butter Chicken

Ingredients
14 cup white wine
5 tablespoons fresh lemon juice
5 tablespoons half and half
12 cup butter, chilled
Salt and pepper, to taste
1 pound pasta of choice, cooked as directed (I prefer smaller shapes like penne)
12 ounces center-cut bacon, chopped
3-4 boneless, skinless chicken breast, cut into small cubes
8 ounces mushrooms, sliced
8 ounces frozen artichoke hearts, thawed
2 teaspoons capers, drained

Instructions
1. To make the sauce, pour the wine and lemon juice into a saucepan over medium heat. Cook at a low boil until the liquid is reduced by 13. Stir in the cream and simmer until it thickens. Gradually add the butter, 1 tablespoon at a time, to the sauce, stirring until completely incorporated. Season with salt and pepper. Remove from heat, keep warm.

2. Heat a large skillet over medium-high heat and cook bacon until crisp.  Remove bacon to paper towels or a sieve, leaving the fat in the skillet.  

3. Add chicken to skillet and cook, stirring, until done.  Season with salt and pepper, to taste, and place with bacon, leaving fat in the skillet.  

4. Add mushrooms, artichoke hearts, and capers to the skillet and cook until the vegetables are soft.  Remove mushroom mixture from skillet and drain fat.  

5. Place chicken, bacon, and mushroom mixture back in the skillet, add sauce, and stir until heated through.  Add pasta, stir well, and serve.  

Lemon Butter Chicken

Comments
For some unknown reason, I was out of capers so the photograph of this dish is missing them.  I was very sad, they really help to make the dish.  I have no idea where I found the original recipe, but I do remember that it called for an entire cup of butter which was entirely too much!  It’s much nicer with only one stick.  Art and I love this dish, the flavors remind us of Piccata.

Unknown

Mexican Sundaes

Ingredients
For Ice Cream
2 cups heavy cream, divided
1 cup whole milk
6 large egg yolks
34 cup sugar
1 vanilla bean, split lengthwise
34 teaspoon vanilla extract
Pinch of salt

For Sundae Assembly
1 sheet Puff Pastry, thawed
Honey
Cinnamon

Instructions
1. Make Ice Cream: In a medium saucepan, gently warm 1 cup of heavy cream, milk, sugar, and salt, until the sugar has dissolved. Scrape the seeds from the vanilla bean into the warmed mixture and add the bean as well. Cover the saucepan, remove from heat, and let steep at room temperature for 30 minutes.

2. Meanwhile, pour the remaining cup of heavy cream into a large bowl and set a strainer on top. Prepare an ice bath by filling a large bowl (one that can fit the bowl with the 1 cup of heavy cream) with ice and water.

3. In a medium bowl, whisk together the egg yolks.

4. Slowly pour the warm cream mixture into the egg yolks, whisking constantly. Then carefully pour the mixture back into the saucepan.  

5. Set the saucepan over medium heat and stir constantly with a wooden spoon. Heat until the custard thickens. When it’s ready it will coat the back of the spoon and when you draw your finger across it, it should leave a definitive trail.

6. Pour the custard through the strainer, into the heavy cream. Stir the cream and custard to incorporate. Take the bean from the strainer and add it to the final mixture. Add the vanilla extract.  

7. Put the bowl into the ice bath, and stir until the mixture has cooled.  Cover the bowl with plastic wrap (or a lid) and chill in the refrigerator for at least 4 hours.  I recommend chilling it overnight.  

8. Freeze the ice cream according to your ice cream machine’s instructions.  (Mine, which is a Cuisinart, takes about 20-30 minutes.)  

9. If you prefer soft serve, eat at this point.  Otherwise freeze until hardened, about 3-4 hours.  

10. Make Sundaes: Preheat oven to 375*F.  Cut puff pastry sheet into 6 pieces and roll out into 5 to 6-inch squares.  Place six small bowls (or mugs) upside down on two baking sheets.  Spray the bottoms of the bowls with cooking spray and place a puff pastry square on the bottom of each bowl.  Bake for 20-25 minutes or until puffed and golden.  (In theory they will form bowls.  Mine didn’t quite work since the bowls I used were too large.)  

11.  Allow puff pastry bowls to cool for a few minutes and then place a few scoops of ice cream into each.  Top with drizzled honey and cinnamon.  
Mexican Sundae **
Comments**
The ice cream in this recipe is the same as the recipe for Stracciatella, just without the chocolate.  This is the best vanilla ice cream I’ve ever had.  It’s so rich and delicious.  The idea for the honey, cinnamon and puff pastry came from the longing for Sopapillas.

Unknown

Tater Tot Casserole

Ingredients
1 pound bacon, sliced
1 pound ground beef
1 teaspoon dried thyme
1 small onion, chopped
2 teaspoons garlic, minced
2 cans (10 12 ounces each) condensed cream of mushroom soup (I use Healthy Request)
12 pound cheddar cheese, shredded
32 ounces frozen tater tots

Instructions
1. Preheat oven to 375*F. Prepare 9x13-inch casserole dish with cooking spray.

2. In a large frying pan or saucepan, cook the bacon over medium-high heat until crisp. Remove to paper towels to drain.

3. Using the same pan, brown the ground beef. Remove ground beef, leaving oil in pan, and drain.

4. Sauté chopped onion and garlic until soft, about 10 minutes.

5. In a large bowl, mix together bacon, beef, onion mixture, thyme and soup. Spread in a layer in the prepared dish. Spread cheese over the top and then cover with tater tots. Bake for 1 hour or until dish is heated through and tater tots are crispy. 

Tater Tot Casserole

Comments
This is a classic trashy meal and oh-so-delicious.  It’s great on a cold evening when you can take advantage of the oven being on for an hour and heating up your home.

Shown here with mustard greens sauteed in bacon fat (from step 2 of the recipe above) and lots of minced garlic.

Unknown

Fresh Tomato Salsa (The Winter Version)

Ingredients
2-3 pints small tomatoes, quartered
14 cup green onions, chopped
14 cup cilantro, chopped
1 tablespoon fresh oregano, chopped
2 cloves garlic, minced
1 teaspoon jalapeño pepper, minced (Optional.  Use more or less as desired)
1 tablespoon olive oil
2 teaspoons fresh lime juice
Salt and freshly ground black pepper, to taste

Instructions
1. Mix all ingredients in a medium bowl.  If desired, process half of the salsa in a food processor or blender.  

2. Let sit, loosely covered, at room temperature, for the flavors to blend. Serve immediately or refrigerate and serve within 4 hours.

Salsa

Comments
This recipe originally came from The New Basics Cookbook.  It ends up being different every time I make it due to availability of ingredients.  In the winter, when delicious fresh tomatoes can’t be found, I make it with small tomatoes since those seem to survive in the grocery store better than the alternatives.  The bowl in the picture is a quadruple recipe since I was feeding a crowd and always err on the side of too much.  I served some chopped avocado with the salsa so that people could add their own if desired, but apparently I was the only person in the group who likes avocado!

New Basics Cookbook

Slow Cooker Salsa Chicken

Ingredients
3-4 boneless, skinless chicken breasts
16 ounces salsa
1 (1 14 ounce) package taco seasoning
1 (10 34 ounce) can cream of chicken soup (I used Healthy Request)
12-1 cup sour cream

Instructions
1. Place chicken in slow cooker and sprinkle with taco seasoning.  Pour salsa and soup over chicken.

2. Cook on LOW 6-8 hours or HIGH 3-4 hours.

3. Remove from heat and stir in sour cream.

4. Shred chicken, if desired.  Serve over rice, if desired.  

Slow cooker salsa chicken

Comments
This is one of the easiest and most ubiquitous slow cooker chicken recipes.  It’s so simple and you can modify it very easily to suit your current desires.  I tend to make it with Peach Salsa and ranch dressing mix instead of the taco seasoning, but you could try any flavor of salsa or seasoning packet based on your own tastes.  16 ounces of salsa yields a very saucy dish, so feel free to reduce it to 8 ounces if you want a less saucy dish.  The chicken comes out so moist and tender – this was a perfect meal for a dreary and dismal day.  I served it with Zataran’s Spanish Rice.

Unknown

Skillet Pasta with Chicken, Peas and Prosciutto

Ingredients
14 ounces ricotta cheese (Not the fat-free kind)
12 cup Parmesan cheese, grated
1 teaspoon lemon zest
Salt and pepper
2 tablespoons olive oil
3-4 boneless, skinless chicken breasts, cut into cubes
6 ounces prosciutto, thinly sliced and cut into 14-inch pieces
1 onion, minced
2 cloves garlic, minced
2 cups chicken broth
2 cups water
1 cup half and half
1 pound small pasta, such as penne or medium shells
1 pound frozen peas
2 tablespoons unsalted butter, cut into 8 pieces
1 tablespoon fresh lemon juice
2 tablespoons fresh mint, chopped

Instructions
1. Combine the ricotta, parmesan, lemon zest, 14 teaspoon salt, and 14 teaspoon pepper in a medium bowl and set aside.  Reserve lemon for juicing in step 5.  

2. Heat the 1 tablespoon oil in a 12-inch nonstick skillet over medium-high heat until shimmering.  Add the chicken and sauté until done, about 10 minutes.  Remove chicken from skillet and set aside.  Heat remaining tablespoon oil and add the prosciutto.  Cook until well browned and crisp, 2 to 3 minutes. Transfer the prosciutto to a paper towel-lined plate, leaving the oil in the skillet.

3. Add the onion and 14 teaspoon salt to the oil left in the skillet and cook over medium heat, stirring often, until softened, 5 to 7 minutes. Stir in the garlic and cook until fragrant about 30 seconds.

4. Stir in the broth, water, and cream, and then add the pasta. Increase the heat to high and cook at a vigorous simmer, stirring often, until the pasta is tender and the liquid has thickened, 15 to 18 minutes.

5. Stir in peas, butter, lemon juice, and chicken and cook until the peas are hot, about 1 minute. Season with salt and pepper to taste. Dot heaping tablespoons of the ricotta mixture over the pasta. Cover and let stand off the heat until the cheese warms and softens, 2 to 4 minutes. Stir well.  Sprinkle with the prosciutto and mint and serve.  

Skillet Pasta with Chicken, Peas and Prosciutto

Comments
The other week, at the Dupont Circle Farmers Market, I picked up a container of fresh ricotta cheese.  I knew I wanted to make something that would really let the flavor of the ricotta come through and I found this dish in The Best of America’s Test Kitchen 2010.  It looked simple and full of good flavors.  I’m a fan of single-skillet meals, especially with all of the busy weeks we’ve had recently!  

This really hit the spot.  The mint seemed strange, but its flavor complimented the rest of the flavors extremely well.  I did tweak the recipe slightly based on quantities that I had on hand, but it all came together easily.  It’s a recipe that lends itself well to experimentation.  

I also want to give a shout out to the new skillet I just picked up.  For the last 12 years I’ve had a large 12-inch nonstick skillet with straight, high sides and I’ve used it many times every week for those years.  I’m sad to say that the skillet finally cooked its last meal and needed to be replaced.  I took a trip to my local Bed, Bath, and Beyond to see what they had, read lots of reviews on my iPhone, and settled on the Anolon Advanced equivalent.  I’ve had it for about a week now and it’s just great.  I’ve been able to sear, deglaze, and everything else with no problem.  It cleans like a dream, the lid has a lovely seal, and it heats very evenly.  The handles are even oven safe to 400*F!  I would certainly consider getting other pieces of cookware from this line in the future.  I’ve always been a Calphalon girl, but I’m glad I tried something different this time.

America’s Test Kitchen 2010