Recipes

Thin and Crispy Oatmeal Cookies

Ingredients
1 cup all purpose flour
34 teaspoon baking powder
12 teaspoon baking soda
12 teaspoon salt
14 tablespoon unsalted butter, softened but still cool
1 cup granulated sugar
14 cup light brown sugar, packed
1 large egg
1 teaspoon vanilla extract
2 12 cups old-fashioned rolled oats

Instructions
1. Adjust oven rack to middle position and heat oven to 350*F. Line 1-3 large baking sheets with parchment paper. Whisk flour, baking powder, baking soda, and salt in medium bowl.

2. In standing mixer fitted with paddle attachment, beat butter and sugars at medium-low speed until just combined. Increase speed to medium and continue to beat until light and fluffy, about 3-5 minutes longer. Scrape down bowl with rubber spatula.

3. Add egg and vanilla and beat on medium-low until fully incorporated. Scrape down bowl again. With mixer running at low speed, add flour mixture and mix until just incorporated and smooth. With mixer still running on low, gradually add oats and mix until well incorporated. Give dough final stir with rubber spatula to ensure that no flour pockets remain and ingredients are evenly distributed.

3. Divide dough into 24 equal portions, each about 2 tablespoons (or use a #30 cookie scoop), then roll between palms into balls. Place cookies on prepared baking sheets, spacing them about 2 12 inches apart, 8 dough balls per sheet. Using fingertips, gently press each dough ball to 34-inch thickness. (I find that if I use the #30 disher, I do not get quite 24 cookies per batch.  If this matters to you, don’t use the disher.)  

4. Bake 1 sheet at a time until cookies are deep golden brown, edges are crisp, and centers yield to slight pressure when pressed, 13-16 minutes, rotating baking sheet halfway through. Transfer baking sheet to wire rack; cool cookies completely on sheet.  
Note: If reusing a baking sheet, allow cookies to cool 15 minutes on the sheet before removing.

Cookies

Comments
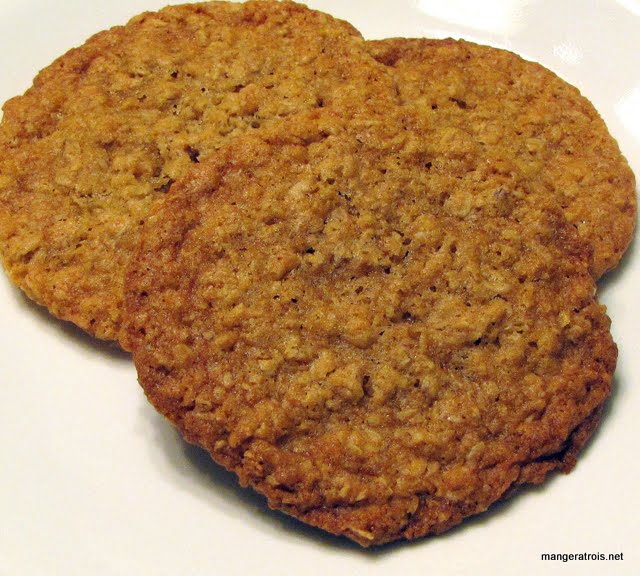
This recipe is from Cook’s Illustrated and it is everything I want in an oatmeal cookie.  I am not a huge fan of raisins and it is always so hard for me to find a recipe that doesn’t call for them.  I know I could just omit them, but it’s not the same.  These, however, are amazing and perfect.  They’re buttery, crispy, full of delicious oatmeal flavor, and simply perfect.  

I admit that I’m not sure if some of the more finicky parts of this recipe are necessary, like only baking one sheet at a time, but I haven’t bothered to experiment.  I trust Cook’s Illustrated.  What I don’t trust is the yield for this recipe.  I sextupled the recipe and it should have yielded 144 cookies but only gave me 116 with my #30 disher method.  But that’s okay, since they’re very large.

Cook’s Illustrated

Chocolate Toffee Pecan Pie Bars

Ingredients
2 cups all purpose flour
12 cup powdered sugar
1 cup cold butter or margarine
14 ounces sweetened condensed milk
6 ounces Skor or Heath bars, chopped
1 cup pecans, chopped
1 egg
1 teaspoon vanilla

Instructions
1. Preheat oven to 350*F (325*F for glass dish).

2. In a medium bowl, combine flour and sugar; cut in butter until crumbly. Press firmly on bottom of ungreased 13 x 9 inch baking pan. Bake 20-25 minutes.  

3. In another bowl, beat condensed milk, egg and vanilla. Stir in pieces of Skor bars and pecans. Spread evenly over baked crust.

4. Bake 25 minutes or until golden brown. Cool and chill thoroughly before cutting into pieces.  Store in refrigerator.  Eat.  

Pecan Pie Bars

Comments
Years ago, one of Art’s coworkers brought these bars into a holiday function at work.  He knew that I would love them and brought me home the recipe a few days later.  I made them the next week and, sure enough, loved them and love them still.  When I don’t want to go through the time intensive process of making proper pecan pie, these are a quick and easy almost-substitute.

Unknown

Potato Samosas

Ingredients
For the filling
1 12 pounds potatoes, cubed
2 tablespoons oil
2 teaspoons cumin seeds
2 tablespoons fresh ginger, peeled and minced
1-3 fresh green chile peppers, such as jalapeño, minced
1 12 tablespoons ground coriander
12 teaspoon salt, or to taste
12 teaspoon garam masala
14 cup fresh cilantro, finely chopped
1 teaspoon mango powder (Optional.  I’ve made it many times without, one time with, and it’s amazing regardless.)
1 cup frozen peas
_
For the assembly_
1 12 cups self-rising flour
3 tablespoons oil
12 teaspoon ajwain seeds, coarsely ground (Optional.  I’ve omitted these due to availability with no problem.)  
12 teaspoon salt, or to taste
13 cup water, approximately
Extra all purpose flour for dusting
1 12 to 2 cups peanut oil, for deep-frying

Instructions
1.  For samosa filling: Bring a large pot of water to boil and cook the potatoes until tender, about 20 minutes.  Heat the oil in a large nonstick wok or saucepan over medium-high heat and add the cumin seeds; they should sizzle upon contact with the hot oil. Mix in the potatoes.

2. Stir about 2 minutes, then add the ginger, green chile peppers, coriander, salt, and garam masala, and stir occasionally until the potatoes are golden, about 10 minutes.  

3. Add the cilantro, mango powder and peas and cook another 5 minutes. Remove from heat and let cool before using.

4. For assembly: Place the self-rising flour, oil, ajwain seeds, and salt in a food processor and pulse a few times to mix. With the motor running, pour the water in a slow stream and process until the flour gathers into a semi-firm ball that does not stick to the sides of the work bowl. Remove to a bowl, cover with plastic wrap or a lid, and let rest at least 1 hour and up to 4 hours. (This allows the gluten to develop.) If keeping for a longer period, refrigerate the dough.

5. Lightly oil your clean hands (to prevent the dough from sticking to them), then divide into 12 1 12-inch balls. Cover with aluminum foil and set aside. Working with each ball separately, flatten it into a disc with your fingertips, coat well with dry flour, the roll with a rolling pin into a 6- to 7-inch circle of uniform 18-inch thickness. If the dough sticks to the rolling surface, coat once again with flour.

6. Cut the circle in half and brush with water about 12-inch in, along the straight edge. Pick up the two corners and place one over and around the other along the straight edge, the press along the straight edge to seal, making a cone. Also pinch the point of the cone to seal. (Alternatively you can make the dough circles using a pasta roller on a thick setting.  I tried this method and it worked amazingly well.)  

7. Hold the cone between your thumb and forefinger, with the pointed side down toward the work surface. Fill the mouth of the cone with 2 to 3 tablespoons of filling. Brush the edges of the mouth of the cone with water and press them together to seal. You should end up with a stuffed triangular pastry. Cover with foil and set aside until ready to fry. Repeat with the other balls of dough.

8. Heat the oil in a wok or skillet over medium-high heat until it reaches 325*F to 350*F on a frying thermometer, or when a small piece of the dough dropped into the hot oil rises to the top after 15 to 20 seconds. Place the samosas in the wok, as many as it can hold at one time without crowding, and fry, turning them a few times with a slotted spatula, until crispy and golden on all sides, 4 to 5 minutes. (If the samosas brown too quickly, it means the heat is too high; lower it.) Transfer to paper towels to drain, then serve.

Samosas

Comments
This recipe is from 1,000 Indian Recipes by Neelam Batra.  I’ve made it numerous times and each time it gets easier.  I’m not going to lie and say “this isn’t as hard as it looks” because it is a pretty complicated recipe.  However it is well worth the effort.  I like to serve these with mango chutney.  Yum.  The trick of using the pasta roller did make the whole process infinitely faster.

1,000 Indian Recipes

Sautéed Kohlrabi and Cress

Ingredients
1 pound small kohlrabi
1 bunch cress (The cress I had was land cress from my CSA.  You can use whatever cress you’ve got.)
2 tablespoon unsalted butter
2 tablespoons fresh lemon juice

Instructions
1. Peel kohlrabi with a vegetable peeler and cut into 2-inch long matchsticks.  Discard coarse stems from cress.  

2. In a large nonstick skillet heat butter over medium high heat until foam subsides.  Saute kohlrabi, stirring, until tender crisp, 5 to 10 minutes.  Add lemon juice and continue stirring for 1 more minute.  Remove skillet from heat and stir in cress.  Season with salt and pepper and serve.  

Kohlrabi

Comments
I got this recipe from epicurious.com and, well, I goofed.  I read the comments before making the dish, as I usually do, and decided to take the advice of the commenters.  This involved boiling the kohlrabi for 10 minutes before sautéing it.  The result was fine, but it would have been significantly better if the kohlrabi had still been on the crispy side of the spectrum instead of the soft side.  

This was the first time I’ve ever had kohlrabi and there’s a story that goes along with it.  I went into the kitchen to start dinner prep and commented to Lance that I had started to feel hungry all of a sudden.  He said that he was feeling hungry too, so I offered him a piece of kohlrabi.  And this is when I found out that a) kohlrabi is really fantastic raw, it’s got a sort of cabbage flavor and b) Lance grew up eating raw kohlrabi as a snack and loves the stuff.  I was actually surprised that I had enough left to cook the dish with!  I ran back to the market and got two more just because it was so tasty!  Who knew?  

Shown here with Filet Mignon with Red Wine Sauce and Creamy Parmesan Orzo.

Internet - Epicurious

Linguine with Chicken, Lemony Broccoli and Sundried Tomatoes

Ingredients
3-4 boneless, skinless chicken breasts
1 large broccoli, about 1 12 pounds, cut into florets
2 tablespoons olive oil
4 cloves garlic, minced
1 teaspoon lemon zest
12 sundried tomatoes, packed in oil, drained, and coarsely chopped
Salt and ground black pepper, to taste
1 pound linguine

Instructions
1. Heat 1 tablespoon oil in large nonstick skillet over medium heat.  Cook chicken for 10-15 minutes per side, or until done, depending on the thickness of the breasts.  Remove from skillet, slice, and reserve.  

2. Add 1 tablespoon oil to skillet and heat over medium heat.  Add the broccoli and cook, stirring, until it is tender crisp, about 5-10 minutes.  Add garlic and cook until garlic is fragrant, about 30-60 seconds.  Add the zest and tomatoes and stir to heat through.  Add the chicken and salt and pepper, to taste.  

3. Meanwhile, bring a large pot of salted water to boil and cook pasta as instructed on the packaging.  Drain pasta and toss with chicken broccoli mixture.  Serve.  

Lemony Broccoli Pasta with Chicken and Sun-Dried Tomatoes

Comments
This is a simple, tasty pasta dish.  It’s also extremely easy to omit the chicken for a vegetarian dish.  It’s nice and light thanks to the lemon zest and the lack of an actual sauce.  Served with a green salad, this makes a perfect summertime, or anytime, meal!

Unknown

Creamy Parmesan Orzo

Ingredients
4 teaspoons pine nuts
1 tablespoon butter
1 cup orzo
1 14 cups broth (I have used beef, chicken, and vegetable broths all with great success.)
1 14 cups water
14 cup Parmesan cheese, grated or shredded
2 tablespoons fresh basil, chopped
14 teaspoon salt
14 teaspoon freshly ground black pepper

Instructions
1. Put pine nuts in a small skillet and heat over medium heat.  Stir frequently until pine nuts start to colour and smell toasted.  Remove from heat and set aside.  (I usually do this step in whatever clean skillet I’ll be using for another part of the meal.)

2. Heat butter in a medium saucepan over medium heat.  Add orzo and cook 3 minutes, stirring constantly.  Stir in broth and water and bring to a boil.  Reduce heat and simmer until liquid is absorbed and orzo is done, about 15 minutes.  

3. Remove from heat.  Stir in cheese, basil, salt, pepper, and pine nuts.  Serve immediately.  

Creamy Parmesan Orzo

Comments
I’ve been making this recipe for quite a few years and I believe it originally came from a Cooking Light annual but I couldn’t tell you which one.  I’ve made it with rice instead of orzo a few times which works quite well.  My standard broth for this is chicken since that’s what I have on hand most of the time, but I’ve made it with vegetable and beef broth as well with equal success.  

Shown here with Honey Butter Pork Tenderloin.

Cooking Light

Cheesy Garlic Bread

Ingredients
5 cloves garlic, grated with a microplane grinder or in a blender cup
8 tablespoon unsalted butter, softened
12 teaspoon water
14 teaspoon salt
14 teaspoon pepper
1 (18-20 inch) baguette, sliced in half horizontally
1 12 cups shredded Italian cheese blend (While low-fat and fat-free cheese will work, I feel like it doesn’t melt as well.)  

Instructions
1. Adjust the oven rack to lower-middle position and heat oven to 400 degrees. Cook garlic, 1 tablespoon butter, and water in small nonstick skillet over low heat, stirring occasionally, until straw coloured. About 7 to 10 minutes.

2. Mix hot garlic, remaining butter, salt and pepper in bowl and spread on cut sides of bread. Sandwich bread back together and wrap loaf in foil. Place on baking sheet and bake for 15 minutes.

3. Carefully unwrap bread and place halves, buttered sides up, on baking sheet. Bake until just beginning to colour, about 10 minutes. Remove from oven and set oven to broil.

4. Sprinkle bread with cheese. Broil until cheese has melted and bread is crisp, 1 to 2 minutes. Transfer bread to cutting board with cheese side facing down. Cut into pieces and serve.  

Note: If, like me, you manage to melt all the butter in step 2, just place it in a sealed container in the fridge and shake or stir it up every 5-10 minutes while it resolidifies.  Once it’s the consistency of softened butter again, proceed with the rest of the recipe.  

Garlic Bread

Comments
This is a recipe from Cook’s Country.  Sadly I got a bit distracted trying to get dinner together and the edges of the bread got a bit more charred than was ideal.  Make sure to keep an eye on things when you are broiling!  The taste was good but I found it to be a bit oily.  I’m not entirely sure what I can do to fix that other than to use less butter, so I think I’ll try that next time.

Cook’s Country

Baked Spiced Nuts

Ingredients
2 large eggs
1 teaspoon vanilla
1 heaping teaspoon cinnamon
12 teaspoon salt
13 cup sugar
5 cups raw, unsalted nuts in large pieces (Whole almonds, walnut halves, or pecan halves work well)

Instructions
1. Preheat oven to 300*F. Generously spray a baking sheet with nonstick cooking spray. (I used a sheet of aluminum foil on the baking sheet and sprayed that with cooking spray to make for easier cleanup.)

2. Crack the eggs into a large bowl and beat well with a fork of whisk. Add the vanilla, cinnamon, salt and 13 cup sugar, and beat until blended.

3. Add the nuts and stir until they are thoroughly moistened. Let stand 5 minutes.

4. Transfer the nuts, plus any remaining liquid, to the prepared baking sheet, and push together into a single layer, so the nuts are touching, but not piled vertically. (It should be one large, flat mass.)

5. Bake on the center rack of the oven for 15 minutes, then use a spatula to scrape the nuts and their coating from the bottom of the baking sheet, and rearrange everything, so nothing is sticking and the nuts get moved around a bit for even cooking.

6. Bake another 15 minutes, and then remove from the oven. If your taste runs sweet, you can sprinkle the nuts with 1 to 2 teaspoons additional sugar while they are still hot and on the baking sheet. Let the nuts cool completely on the baking sheet, then transfer them to a container with a lid for storage or just transfer them into your mouth.  

Baked Spiced Nuts Comments
Being a fan of Mollie Katzen I recently picked up a copy of Eat, Drink, and Weigh Less which includes recipes that she contributed.  I found this recipe for spiced nuts and thought it would be great for an appetizer at a Game Day.  

I made the recipe with a mix of pecans and almonds.  Both were delicious but I think I might stick just to the pecans next time since the pecans were just transcendent.  

I get some spiced nuts at the Ren Faire every year and, while I like them quite a bit, I find them to be a bit too sweet.  The candy aspects tend to outweigh the nut characteristics that I enjoy.  This recipe had a nice, light coating.  It had the right amount of flavor and I’m extremely pleased with how they turned out.  

Sadly, I forgot to take a picture and they were all gone by the time I remembered.  I have a feeling I’ll be making them again.  Maybe for the holidays!

Eat, Drink, and Weigh Less

Coconut Sorbet Attempt #1

Ingredients
2 (14 12 ounces each) cans coconut milk
1 12 cups shredded coconut
1 cup sugar

Instructions
1. In a medium saucepan, combine the ingredients and bring to a boil, stirring until sugar is completely dissolved.

2. Remove from heat, cool, then refrigerate until fully chilled, preferably overnight.  

3. Freeze in an ice cream maker according to manufacturer’s directions.

Coconut Sorbet

Comments
For some reason my ice cream maker didn’t want to freeze this so I ended up freezing it in the freezer and just stirring it every hour.  Unfortunately I wasn’t very pleased with the amount of shredded coconut in the recipe, the texture was not very pleasant.  Next time I’ll reduce the amount of shredded coconut.  It certainly has potential.  

Shown here with Chocolate Chai Cake.

Internet - Recipe Zaar

Chicken (or Turkey) Pot Pie

Ingredients
Two pie crusts
4 cups chicken (or turkey), cooked and shredded
2 cups chicken broth
6 tablespoons unsalted butter, divided
12 cup all purpose flour
1 12 cups dairy (milk, half and half, light cream, etc)
2-3 tablespoons sherry
Lemon juice, to taste
Salt and pepper, to taste
Nutmeg, to taste
1 medium onion, chopped
3 medium carrots, sliced 14-inch thick (or a few handfuls of baby carrots)
4 celery stalks, sliced 14-inch thick
34 cup frozen peas, thawed
16 ounces mushrooms, sliced

Instructions
1. Preheat oven to 400*F.  Spray a deep casserole or pie dish with cooking spray and press 1 pie crust into dish.  Bake for 15 minutes and remove from oven.  

2. Melt 4 tablespoons butter in large saucepan over medium-low heat.  Add flour and whisk until smooth.  Cook, whisking constantly, for 1 minutes.  Remove the pan from the heat.  Add chicken broth and whisk until smooth.  Add in milk and whisk.  Increase heat to medium and bring the mixture just to a simmer, whisking constantly to break up any clumps.  Simmer, stirring, for 1 minute.  

3. Stir in chicken (or turkey) and sherry.  Cook for one minute more and season to taste with lemon juice, salt, pepper, and nutmeg.  Set aside.  

4. Meanwhile, heat remaining 2 tablespoons butter in a large skillet over medium-high heat.  Add onion, carrots, celery, and mushrooms.  Sauté until the vegetables have released their water and are just tender, about 5-10 minutes.  Drain vegetables and return to pan.  Add peas and creamed chicken.  Check for seasoning and add more salt and pepper if necessary.  

5. Pour the chicken mixture into the dish and cover with the remaining crust.  Cut a few holes in the top crust to allow steam to escape.  Bake until chicken is bubbly and the top crust is nicely browned, about 30-60 minutes depending on the thickness of your pot pie.  (You might want to place a baking sheet underneath your dish to catch any drips.)  Allow to cool for 10-15 minutes before serving.  

Chicken Pot Pie

Comments
This recipe is from the 1997 edition of The Joy of Cooking and I’ve made it numerous times with chicken and a few times with turkey.  It is flexible enough that you can add other vegetables as well, I’m a fan of a mushroom and broccoli mixture.  Please do remember to season with salt and pepper, it’s pretty important.  This is pretty much the perfect cold weather comfort food in my opinion!

Joy of Cooking (1997)