Recipes

Machinefree Chocolate Ice Cream

Ingredients
1 teaspoon instant coffee or espresso powder
1 tablespoon hot water
4 ounces bittersweet chocolate chips
12 cup sweetened condensed milk
12 teaspoon vanilla extract
Pinch salt
1 14 cups heavy cream, cold

Instructions
1. Combine coffee (or espresso) powder and hot water in small bowl. Let stand until coffee dissolves, about 5 minutes. Microwave chocolate, sweetened condensed milk, and coffee mixture in bowl, stirring every 10 seconds, until chocolate is melted, about 1 minute. Stir in vanilla and salt.

2. With mixer on medium-high speed, whip cream to soft peaks, about 2-3 minutes. Whisk one-third of whipped cream into chocolate mixture. Fold remaining whipped cream into chocolate mixture until incorporated. Freeze in airtight container until firm, at least 6 hours or up to 2 weeks. Serve. 

Ice Cream

Comments
When I read the recipe for this ice cream in the 2009 Cook’s Country Annual, I was intrigued.  “Ice cream without a machine?  Sure, I’ll try it.”  For all intents and purposes, this is frozen chocolate mousse.  And it’s delicious.  It’s super rich and the texture is perfect.  I might consider using half semisweet chips next time, since it was almost too rich, but this will appease the chocolate lover in any home.  And, best of all, it doesn’t require an ice cream machine!

Cook’s Country 2009

Skillet Chicken Vesuvio

Ingredients
3-4 boneless, skinless chicken breasts
Salt and pepper
3 tablespoons olive oil
1 12 pounds baby red potatoes, scrubbed and halved (I used normal size red potatoes and cut them into 34-inch slices.)
2 cloves garlic, minced
1 teaspoon fresh rosemary, minced
12 teaspoon dried oregano
12 cup white wine
1 12 cups chicken broth
1 cup frozen peas
2 tablespoons unsalted butter
2 teaspoons lemon juice

Instructions
1. Pat chicken dry with paper towels and season with salt and pepper. Heat 1 tablespoon oil in large nonstick skillet over medium-high heat until just smoking. Cook chicken until golden, about 3 minutes per side. Transfer to plate.

2. Add remaining oil to pan and heat until shimmering. Cook potatoes, cut-side down, until golden brown, about 7 minutes. Stir in garlic, rosemary, oregano, and 12 teaspoon salt and cook until fragrant, about 30 seconds. Add wine and broth, scrapping up any browned bits with wooden spoon, and bring to boil. Return browned chicken to skillet on top of potatoes. Reduce heat to medium-low and simmer, covered, until chicken is cooked through and potatoes are tender, about 12 minutes. Using slotted spoon, transfer chicken and potatoes to serving platter; tent with foil.

3. Increase heat to medium-high and cook, uncovered, until sauce is reduced to 1 cup, about 5-10 minutes. Stir in peas and cook until heated through, about 1 minute. Off heat, whisk in butter and lemon juice and season with salt and pepper. Pour sauce over chicken and potatoes. Serve. 

Skillet Chicken Vesuvio

Comments
I’ve made Chicken Vesuvio before and we’ve all enjoyed it, so I figured I’d give the skillet version from the 2008 Cook’s Country Annual a try.  It was extremely easy both in the prep and cooking aspects.  The flavor was great and we enjoyed it.  I did miss the artichoke hearts of the other version, but this is a tasty dish in its own right.

Cook’s Country 2008

Cheesy Chicken and Broccoli Bake

Ingredients
4 boneless, skinless chicken breasts
Salt and pepper
4 tablespoons unsalted butter
1 onion, chopped fine
14 cup all purpose flour
1 cup chicken broth
12 cup half and half
12 cup dry sherry
1 12 pounds broccoli, cut into florets, stems sliced thin
1 12 cups Parmesan cheese, grated

Instructions
1. Adjust oven rack to upper-middle position and heat broiler. Pat chicken dry with paper towels and season with salt and pepper. Melt 1 tablespoon butter in large nonstick skillet over medium-high heat. Cook chicken until golden brown, about 3 minutes per side. Transfer to plate.

2. Add remaining butter and onion to empty skillet and cook until onion is beginning to brown, about 2 minutes. Stir in flour and cook until golden, about 1 minute. Whisk in broth, cream, and sherry and simmer until thickened, about 3 minutes. Return chicken to skillet; reduce heat to low, and simmer, covered, until chicken is cooked through, about 15 minutes. Transfer chicken and sauce to broiler-safe baking dish.  (I cut the chicken into small pieces at this point, since we were eating out of bowls.)

3. Meanwhile, microwave broccoli on high power, covered, in large bowl until bright green and slightly softened, 2 to 4 minutes. Add cheese to bowl and toss well. Season with salt and pepper and pour broccoli mixture over chicken. Broil until browned and bubbly, 2 to 4 minutes. Serve.

Chicken and Broccoli Bake

Comments
This recipe is from the 2008 Cook’s Country Annual.  Well, the original is, I sort of screwed it up.  What you see here is what I made, and I think it turned out fantastically even though I failed at reading.  The sauce was very tasty and the broccoli had a nice roasted taste and texture.  I served it over rice.

Cook’s Country 2008

French Onion Soup Attempt #1

Ingredients
Soup
3 tablespoons unsalted butter, cut into 3 pieces
6 large yellow onions (about 4 pounds), halved and cut into 14-inch thick moons
Salt
2 cups water plus extra for deglazing
12 cup dry sherry
4 cups chicken broth
2 cups beef broth
6 sprigs fresh thyme, tied with kitchen twine
1 bay leaf
Ground black pepper

Cheese Croutons
1 baguette, cut on bias into 12-inch slices
8 ounces gruyere cheese, shredded

Instructions
1. For the soup: Adjust oven rack to lower-middle position and heat oven to 400*F. Generously spray inside of heavy-bottomed large Dutch oven with nonstick cooking spray. Place butter in pot and add onions and 1 teaspoon salt. Onions will just about fill the Dutch oven. 

2. Cook, covered, 1 hour (onions will be moist and slightly reduced in volume). Remove pot from oven and stir onions, scraping bottom and sides of pot. Return pot to oven with lid slightly ajar and continue to cook until onions are very soft and golden brown, 1 12 to 1 34 hours longer, stirring onions and scraping bottom and sides of pot after 1 hour.

3. Carefully remove pot from oven and place over medium-high heat. Using oven mitts to handle pot, cook onions, stirring frequently and scraping bottom and sides of pot, until liquid evaporates and onions brown, 15 to 20 minutes, reducing heat to medium if onions are browning too quickly. Continue to cook, stirring frequently, until pot bottom is coated with dark crust, 6 to 8 minutes, adjust heat as necessary. (Scrape any fond that collects on spoon back into onions.) Stir in 14 cup water, scraping pot bottom to loosen crust, and cook until water evaporates and pot bottom has formed another dark crust, 6 to 8 minutes. Repeat process of deglazing 2 or 3 more times, until onions are very dark brown. Stir in sherry and cook, stirring frequently, until sherry evaporates, about 5 minutes. (I deglazed four times for a total of 1 cup of water.)

4. Stir in broths, 2 cups water, thyme, bay leaf, and 12 teaspoon salt, scraping up any final bits of browned crust on bottom and sides of pot. Increase heat to high and bring to simmer. Reduce heat to low, cover, and simmer 30 minutes. Remove and discard herbs, then season with salt and pepper.

5. For the croutons: While soup simmers, arrange baguette slices in single layer on baking sheet and bake in 400*F oven until bread is dry, crisp, and golden at edges, about 10 minutes. Set aside.

6. To serve: Place oven rack 6 inches from broiler element and heat broiler. Set individual broiler-safe crocks on baking sheet and fill each with about 1 34 cups soup. Top each bowl with 1 or 2 baguette slices (do not overlap slices) and sprinkle evenly with gruyere. Broil until cheese is melted and bubbly around edges, 3 to 5 minutes. Let cool 5 minutes before serving. 

French Onion Soup

Comments
I really love French Onion Soup.  If I see it on a menu and it’s not super hot outside, I’m likely to order it.  However, I’ve never made it myself because no one else in the house likes it the way I do.  With all of the snow we’ve been getting, I decided that there was no better time to make my own French Onion Soup than this week – especially since I’d just seen a recipe for it in the 2008 Cook’s Illustrated Annual.  There were a couple parts of the recipe that I was unsure about, but I followed it to the letter since it’s something I’ve never made before. 

This soup was pretty fantastic.  The multiple deglazings of the onions really yielded a deep, rich flavor to the soup.  That part of the recipe is definitely a keeper for next time. 

Even if the Test Kitchen prefers the taste of sherry to other alcohols for this soup, I’m not sure that I do.  Next time, I’d try using red wine instead, which has been my preference in the French Onion-style casseroles I’ve made in the past. 

I was unsure about the blend of beef and chicken broths, but it worked quite well and the flavor of the broth part was lovely.  However, I think I’d try all beef broth next time, just to see how that works. 

I’d also like the soup to be more… velvety.  Next time I’ll either try adding some flour after all the deglazing or I’ll simmer the soup for longer and remove the lid in step 4. 

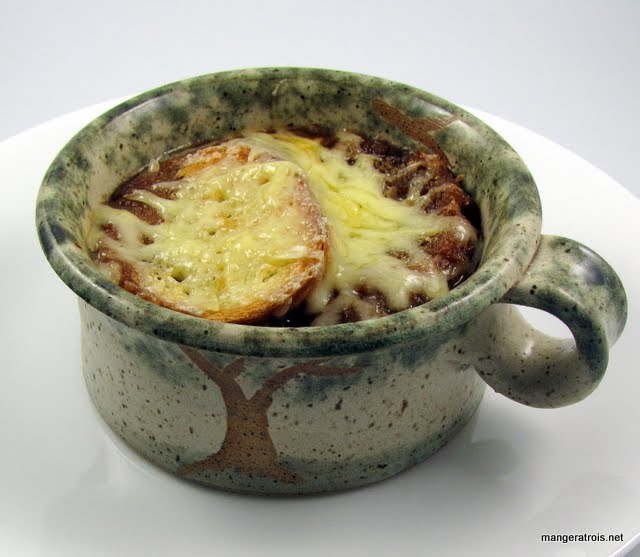
Since I was only serving myself soup, I used the toaster oven for the croutons and the final broiling.  This worked very well for a single serving.  The first bowl of soup I made, shown here in a gorgeous crock that our best friend Brian gave us one year, had cheese only on top of the crouton.  For the second bowl I split the cheese and put a bit under the crouton and a bit on top of it.  I think I like the way the second bowl turned out better because the crouton wasn’t completely covered with cheese which let it crisp up a little more during the final broiling. 

I will definitely be making, and tweaking, this again.  It’s a great starting point for my experimentation in French Onion Soup.

Cook’s Illustrated 2008

Bread Machine Sourdough Pesto Bread

Ingredients
-- 1 12-Pound Loaf –
1 cup sourdough starter
13 cup fat-free milk
2 tablespoons olive oil
3 tablespoons pesto
3 cups bread flour
1 tablespoon sugar
1 12 teaspoons garlic powder
1 teaspoon dried marjoram
1 teaspoon dried basil
1 teaspoon salt
2 teaspoons bread machine yeast

-- 2-Pound Loaf –
1 13 cups sourdough starter
12 cup fat-free milk
3 tablespoons olive oil
14 cup pesto
4 cups bread flour
1 12 tablespoons sugar
1 34 teaspoons garlic powder
1 14 teaspoons dried marjoram
1 14 teaspoons dried basil
1 12 teaspoons salt
2 14 bread machine yeast

Instructions
1. Place all ingredients in the pan according to the order in the manufacturer’s instructions. Set crust on dark and program for the Basic or French Bread cycle; press Start. (This recipe is not suitable for use with the Delay Timer.)

2. When the baking cycle ends, immediately remove the bread from the pan and place it on a rack. Let cool to room temperature before slicing. 

Pesto Sourdough Bread

Comments
Now that I’ve got the hang of keeping this sourdough starter going, I need to make a loaf every week or every other week to make it worthwhile.  While I love basic sourdough bread, I wanted to try something new so I turned to The Bread Lover’s Bread Machine Cookbook and found this recipe.  The bread is great, full of flavor with that wonderful sourdough taste.  Yum!

The Bread Lover’s Bread Machine Cookbook

Pasta with Butternut Squash and Sage

Ingredients
6 ounces center-cut bacon, cut into 14-inch pieces
8 large fresh sage leaves, whole, plus 1 tablespoon, minced
2 pound butternut squash, peeled, seeded, and cut into 12-inch dice
1 tablespoon unsalted butter
6 green onions, sliced thin
14 teaspoon freshly grated nutmeg
1 teaspoon sugar
Salt and pepper
2 cups chicken broth
1 pound penne
14 cup Parmesan cheese, grated
Juice of 1 lemon
13 cup pine nuts, toasted (Toast in a dry skillet over low heat until fragrant and starting to colour.) 

Instructions
1. Cook bacon in large skillet over medium heat until crisp, about 10 minutes. Add whole sage leave and cook until fragrant, about 1 minute. Strain mixture through fine-mesh strainer into small bowl, reserving bacon fat and bacon-sage mixture separately.

2. Return skillet to high heat, add 2 tablespoons reserved bacon fat (adding olive oil if necessary) and heat until shimmering. Add squash in even layer and cook, without stirring, until beginning to caramelize, 4 to 5 minutes. Continue cooking, stirring occasionally, until spotty brown, 3 to 4 minutes longer. Add butter and allow to melt, about 30 seconds. Add green onions, nutmeg, sugar, 12 teaspoon salt, 34 teaspoon pepper, and minced sage; cook, stirring occasionally, until green onions are softened, about 3 minutes. Add broth and bring to simmer; continue to cook until squash is tender, 1 to 3 minutes longer.

3. Meanwhile, bring 4 quarts water to boil in large Dutch oven over high heat. Add 1 tablespoon salt and pasta. Cook until just al dente, then drain pasta and transfer back to Dutch oven.

4. Add squash mixture to pasta; stir in Parmesan cheese, lemon juice, and reserved bacon-sage mixture, and pine nuts.  Serve with additional Parmesan if desired. 

Squash Pasta

Comments
This recipe is from the 2009 Cook’s Illustrated Annual.  Art love butternut squash and pasta so I picked this recipe to make just for him.  Sadly, I was foiled by the weather since he is stuck in sunny Arizona while Lance and I are eating butternut squash pasta in snowy Maryland.  It was, however, delicious. 

I recommend toasting the pine nuts in the skillet before you cook the bacon. 

Shown here with Roast Beef Tenderloin with Shallot and Parsley Butter.

Cook’s Illustrated 2009

Baked Ziti #2

Ingredients
1 pound cottage cheese, whole milk or low-fat (I used 1%.)
2 large eggs, lightly beaten
1 12 cups Parmesan cheese grated
Salt
1 pound ziti
2 tablespoons olive oil
2 zucchini, diced
5 cloves garlic, minced or pressed
1 (28-ounce) can tomato sauce
1 (14.5-ounce) can diced tomatoes
1 teaspoon dried oregano
12 cup fresh basil, chopped
1 teaspoon sugar
Ground black pepper
34 teaspoon cornstarch
1 cup half and half
8 ounces low-moisture mozzarella cheese, cut into 14-inch pieces (This is the mozzarella you find in blocks, not the fresh mozzarella that comes packed in water.)

Instructions
1. Adjust oven rack to middle position and heat oven to 350*F. Whisk cottage cheese, eggs, and 1 cup Parmesan together in medium bowl; set aside. Bring 4 quarts of water to boil in large Dutch oven over high heat. Stir in 1 tablespoon salt and pasta; cook, stirring occasionally, until pasta begins to soften but is not yet cooked through, 5 to 7 minutes. Drain pasta and leave in colander (do not wash Dutch oven).

2. Meanwhile, heat oil in 12-inch skillet over medium heat.  Add zucchini and cook, stirring, until starting to soften.  Add garlic and continue cooking until garlic is fragrant, but not brown, about 2 minutes.  Stir in tomato sauce, diced tomatoes, and oregano; simmer until thickened, about 10 minutes. Off heat, stir in 12 cup basil and sugar, then season with salt and pepper.

3. Stir cornstarch into half and half in small bowl; transfer mixture to now-empty Dutch oven set over medium heat. Bring to simmer and cook until thickened, 3 to 4 minutes. Remove pot from heat and add cottage cheese mixture, 1 cup tomato sauce, and 34 cup mozzarella, then stir to combine. Add pasta and stir to coat thoroughly with sauce.

4. Spread remaining tomato sauce evenly over pasta. Sprinkle remaining 34 cup mozzarella and remaining 12 cup Parmesan over top. Cover baking dish tightly with foil or lid and bake for 30 minutes.

5. Remove foil and continue to cook until cheese is bubbling and beginning to brown, about 30 minutes longer. Cool for 20 minutes before serving. 

Baked Ziti

Comments
I love baked ziti and thought this recipe from the 2009 Cook’s Illustrated Annual looked tasty.  Lance was sad that it was meatfree, but we both found it to be full of flavor.  Next time, to satisfy the carnivores, I might add some cooked sausage or ground beef to the sauce.  I really loved the abundance of basil in this recipe, it was nice and spicy.

Sadly Baked Ziti is one of those things that never looks very pretty in pictures.  I assure you, the picture does not do it justice at all.

Cook’s Illustrated 2009

Roast Beef Tenderloin with Shallot and Parsley Butter

Ingredients
For the roast
1 beef tenderloin, trimmed and tied for roasting
2 teaspoons kosher salt
1 teaspoon freshly ground black pepper
2 tablespoons unsalted butter, softened
1 tablespoon olive oil
_
For the butter_
4 tablespoons unsalted butter, softened
2 tablespoons shallot, minced (about 2 tablespoons)
1 clove garlic, minced or pressed
1 tablespoon fresh parsley, finely chopped
14 teaspoon table salt
14 teaspoon freshly ground black pepper

Instructions
1. Sprinkle roast evenly with salt, cover loosely with plastic wrap, and let stand at room temperature 1 hour. Meanwhile, adjust oven rack to middle position and heat oven to 300*F.

2. For the butter: combine all ingredients in medium bowl.  Set aside.

3. Pat roast dry with paper towels. Sprinkle roast evenly with pepper and spread unsalted butter evenly over surface. Transfer roast to wire rack set in rimmed baking sheet. Roast until instant-read thermometer inserted into center of roast registers 125*F for medium-rare, 40 to 55 minutes, or 135*F for medium, 55 to 70 minutes, flipping roast halfway through cooking.

4. Heat oil in large skillet over medium-high heat until just smoking. Place roast in skillet and sear until well browned on four sides, 1 to 2 minutes per side (total of 4 to 8 minutes). Transfer roast to cutting board and spread 2 tablespoons flavored butter evenly over top of roast; let rest 15 minutes. Remove twine and cut meat crosswise into 12-inch-thick slices. Serve with flavored butter on the side. 

Filet with butter

Comments
It’s safe to say that my family loved filet mignon and when our butcher has it on sale for $4.50/lb that’s just too good to pass up.  While steaks are always nice, once in a while it’s great to have a roast instead.  This recipe in the 2009 Cook’s Illustrated Annual inspired me to pull a frozen roast out of the freezer.  I was thrilled with the results.  The butter was fantastically garlicky and rich.  The meat was tender, juicy, and perfectly medium rare.  It was hard to get enough!

Shown here with Pasta with Butternut Squash and Sage.

Cook’s Illustrated 2009

Brussels Sprouts and Bacon Pasta

Ingredients
1 pound pasta (I used a mix of penne and some other short pasta since I had two partial boxes.)
12 ounces center-cut bacon, chopped
1 pound frozen Brussels sprouts
2-3 cloves garlic, minced

Instructions
1. Bring pot of salted water to a boil. Cook and drain pasta as instructed.

2. Sauté bacon in large skillet over medium heat. Add olive oil if necessary to prevent from sticking. Cook, stirring occasionally, until crisp. 

3. While bacon is cooking, microwave Brussels sprouts for 3-4 minutes until thawed, but not fully cooked. Cut Brussels sprouts in half, quarters, or slice in a food processor.

4. When bacon is crisp, leaving fat and bacon in skillet, add garlic and Brussels sprouts. Continue cooking until Brussels sprouts are heated through. Season with salt and pepper. Add pasta to skillet, stir well to combine, check for seasonings and add more salt and pepper as necessary.

Brussels Bacon Pasta

Comments
Thanks to a very positive Brussels sprouts experience in college, I love them.  However, not everyone else I live with does.  Everyone in the house does, however, love bacon!  So I devised this recipe based on many similar recipes that I read.  It’s super simple and pork fat really does make everything better.  I use frozen Brussels sprouts because the fresh ones here are very unreliable.  If you have access to fresh ones, feel free to use them! 

Shown here with Maple-Ginger Glazed Chicken.

Person - Gwen

Maple-Ginger Glazed Chicken

Ingredients
12 cup maple syrup (The real stuff, please.)
1 tablespoon soy sauce
1 teaspoon fresh ginger, grated
18 teaspoon cayenne pepper
3-4 boneless, skinless chicken breasts
Salt and pepper
1 tablespoon olive oil

Instructions
1. Combine syrup, soy sauce, ginger, and cayenne in small bowl and set aside. Pat chicken dry with paper towels and season with salt and pepper. Heat oil in large nonstick skillet over medium-high heat until just smoking. Cook chicken until golden brown, about 5 minutes per side.  (My chicken was still somewhat frozen in the middle so I did 5 minutes a side on medium-low and then 5 minutes a side on medium-high.)

2. Reduce heat to medium-low and add syrup mixture to skillet. Simmer, turning chicken once or twice to coat, until glaze is slightly thickened and chicken is cooked through, 2 to 4 minutes. Serve with extra glaze on the side. 

Maple Chicken

Comments
I’m always looking for new, flavorful, and easy ways to prepare chicken… and I love maple syrup.  I’ve also got a ridiculous amount of maple syrup in the house because I forgot to check my supply before going to the store too many times.  This recipe is from the 2007 Cook’s Country Annual and it’s a bit sweet, but not overly so.   It came together extremely quickly, even with the semi-frozen chicken, and I’m pleased with how it turned out!  I served the chicken with a pasta side, but it would work well over rice as well. 

Shown here with Brussels Sprouts and Bacon Pasta.

Cook’s Country 2007