Recipes

Cod with Lemon-Caper Sauce

Ingredients
1 tablespoon olive oil
1 tablespoon unsalted butter
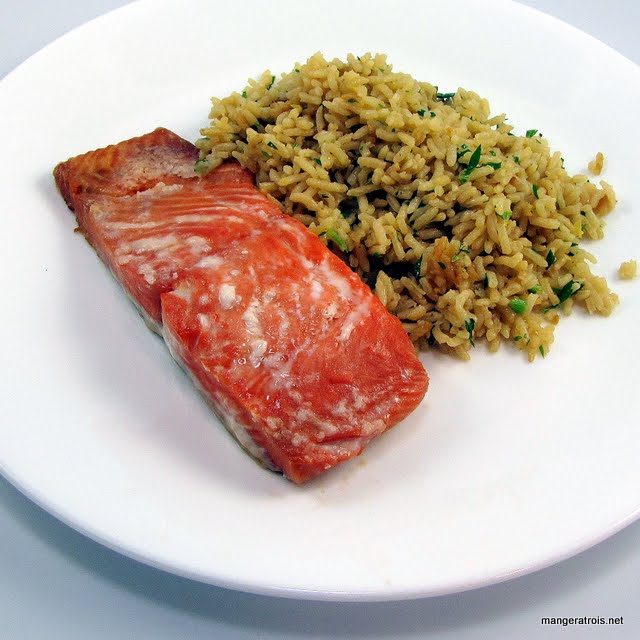
2 (6 ounces each) pieces cod
Salt and freshly ground black pepper
Juice of 2 lemons
1 tablespoon capers, rinsed
2 tablespoons fresh parsley, chopped

Instructions
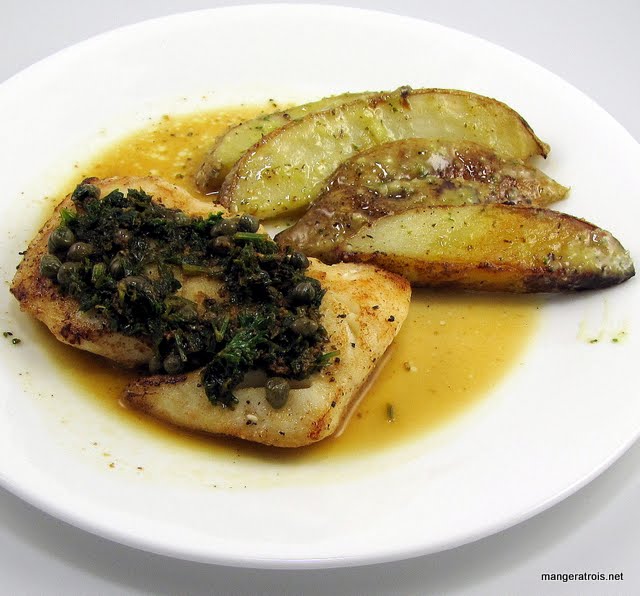
1. Heat oil and butter in skillet over medium heat.  Season fish with salt and pepper and sauté until lightly browned on both sides, about 5 minutes per side.  Remove fish from skillet and reduce heat to low. 

2. Add lemon juice, capers, and parsley to the skillet.  Simmer for 2-3 minutes, or until the sauce is slightly reduced.  Pour sauce over fish. 

Cod

Comments
I found this recipe on the blog A Mingling of Tastes.  Lance and I are both cod fans and I was looking to make something other than my typical salmon.  This recipe definitely has potential, but it was entirely too lemony for both of us, and I love lemon!  Next time, I would reduce the juice to just that of one lemon. 

Shown here with Greek Potatoes.

Internet - A Mingling of Tastes

Baked Chicken Breasts with Parmesan-Garlic Crust

Ingredients
2 slices white bread, torn into pieces and processed until coarsely ground in food processor
12 cup Parmesan cheese, grated
3 cloves garlic, minced
2 tablespoons olive oil
12 teaspoon salt
Pepper
3-4 boneless, skinless chicken breasts
14 cup fresh basil, minced
14 cup mayonnaise

Instructions
1. Adjust oven rack to upper-middle position and heat oven to 425*F. Combine bread crumbs, Parmesan, garlic, oil, salt, and pepper to taste in bowl.

2. Place chicken in 13 by 9-inch baking dish. Combine basil and mayonnaise in small bowl and spread mixture evenly over chicken. Sprinkle bread-crumb mixture over mayonnaise, pressing lightly to adhere.

3. Bake until crumbs are golden brown and instant-read thermometer inserted into thickest part of chicken registers 160*F, 20 to 30 minutes depending on thickness of the breasts.

Parmesan-Garlic Chicken

Comments
This recipe is from the 2006 Cook’s Country Annual and it was extremely flavorful and moist.  My chicken breasts were pretty thick so I had to cook them for 30 minutes.  I avoided using my food processor for the bread and just used the small chopper attachment for my hand blender.  I had to do each piece of bread separately, but it’s nice not to have to clean the actual food processor. 

Shown here with Pasta Caprese.

Cook’s Country 2006

Rice Cooker Riz au Parmesan

Ingredients
3 tablespoons unsalted butter
14 cup onion, finely chopped
12 teaspoon garlic, minced
1 cup long grain white rice
1 23 cups chicken broth
Salt
Freshly ground black pepper
3 tablespoons Parmesan cheese, freshly grated

Instructions
1. Set the rice cooker for the Quick Cook or regular cycle. Place 2 tablespoons of the butter in the rice bowl. When melted, add the onion and garlic. Cook, stirring occasionally, until softened, about 2-10 minutes. Add the rice and cook, stirring, until all the grains are evenly coated and hot, about 10 minutes. Add the broth and salt and pepper to taste; stir just to combine. Close the cover and reset for the regular cycle.

2. When the machine switches to the Keep Warm cycle, let the rice steam for 10 minutes. Fluff the rice with a wooden spoon or rice paddle. This pilaf will hold on Keep Warm for up to 1 hour.

3. When ready to serve, stir in the remaining 1 tablespoon butter and the cheese. Serve immediately. 

Rice Cooker Riz au Parmesan

Comments
This recipe The Ultimate Rice Cooker Cookbook.  I hadn’t known that you could sauté in the rice cooker, but apparently you can!  I think that some of the heating element in my cooker might be controlled by weight, since nothing got really hot until I added the rice.  Everything went well once the rice was added and the resulting dish was pretty great.  Lance felt that it was a very light-feeling dish, the rice was nice and fluffy compared to my usual rice preparations.  It also wasn’t overwhelmingly cheesy which is always a plus with Lance. 

I doubled the recipe because I’ve got a large (10-cup) rice cooker, but if you have a 5-cup one you don’t need to double what’s shown here.  If you don’t have a rice cooker, you could make this in a saucepan with your usual rice to liquid ratio. 

Shown here with Chicken with Mustard Wine Cream Sauce.

The Ultimate Rice Cooker Cookbook

Rice Cooker Lemon Rice

Ingredients
1 cup long grain white rice
1 12 cups chicken broth
1 pinch salt
1 clove garlic, peeled
2 teaspoons lemon zest
2 tablespoons unsalted butter
2 tablespoons fresh parsley, minced

Instructions
1. Place the rice in the rice cooker bowl. Add the broth and salt, stir to combine, then place the garlic in the center on top of the rice. Close the cover and set for the regular cycle.

2. When the machine switches to the Keep Warm cycle, add the lemon zest, butter, and parsley; stir to combine. Close the cover and let the rice steam for 10 minutes. Fluff the rice with a wood spoon or rice paddle. This rice will hold on Keep Warm for 1 to 2 hours.

Rice Cooker Lemon Rice

Comments
This recipe is from The Ultimate Rice Cooker Cookbook which I bought recently when I got my rice cooker.  One of my goals this week was to try out some rice cooker (recipes and I figured this would go well with the fish I planned to prepare.  I doubled the recipe because I’ve got a large (10-cup) rice cooker, but if you have a 5-cup one you don’t need to double what’s shown here. 

Next time, I think I’d increase the lemon zest and maybe add some lemon juice in with the chicken stock, I’d have preferred a more lemony rice dish.  I did enjoy it quite a bit and the lemony rice went well with the salmon. 

If you don’t have a rice cooker, you could make this in a saucepan with your usual rice to liquid ratio. 

Shown here with Salty Sugared Salmon.

The Ultimate Rice Cooker Cookbook

Salty Sugared Salmon

Ingredients
4 (6-ounce) salmon fillets
6 tablespoons raw or coarse sugar
4 tablespoons kosher salt

Instructions
1. Mix sugar and salt together in a small bowl.  Place salmon, skin side down, in a dish.  Cover the salmon with salt and sugar mixture, cover the dish, and refrigerate for at least 2 hours and up to 4 hours. 

2. Preheat oven to 500*F.  Place salmon on a baking sheet, skin side down.  Roast for 7-10 minutes or until salmon is done and easily flakes. 

Salty Sugared Salmon

Comments
This recipe is from the blog My Man’s Belly.  Salmon is probably my favorite fish and it’s also one that I know I can always find at the store which is convenient when I’m meal planning.  Lance and I both found this to be a bit too salty, but otherwise it was very nice.  Next time, I’d reduce the salt to 2 tablespoons from the 4 here.  The skin also stuck to the baking sheet, so perhaps pan searing this might have worked better?  This is a fairly simple dish, just be sure to remember the refrigeration time when planning your evening!

Shown here with Rice Cooker Lemon Rice.

Internet - My Man’s Belly

Chicken with Mustard Wine Cream Sauce

Ingredients
3-4 boneless, skinless chicken breasts
14 teaspoon salt
14 teaspoon pepper
2 tablespoons olive oil
14 cup white wine
12 cup half and half
2 tablespoons Dijon mustard
12 teaspoon dried thyme or 1 teaspoon minced fresh thyme

Instructions
1. Sprinkle chicken breasts with salt and pepper. In a large skillet, heat oil over medium-high heat. Add chicken and sauté until cooked through, 5-10 minutes a side depending on thickness. Transfer to a plate and keep warm.
2. Pour wine into hot skillet and cook, stirring, until reduced by half, about 1 minute. Stir in half and half, mustard, and thyme. Cook, stirring, until thickened, about 2 minutes.
3. Pour any accumulated chicken juices into sauce, stir, and serve over chicken. 

Chicken with Mustard Wine Cream Sauce

Comments
This recipe is from the blog Framed and it looked pretty and simple.  Simplicity is always a plus with cooking.  I certainly enjoy complex (recipes that take hours to prepare, but nothing beats a quick and simple chicken preparation on a busy day.  The mustard flavor was great yet not overwhelming.  Delicious. 

Shown here with Rice Cooker Riz au Parmesan.

Internet - Framed

Swiss Chard Tart

Ingredients
2 pounds Swiss chard, leaves and stems chopped
4 tablespoons olive oil
1 onion, diced
2 cloves garlic, minced
18 cup fresh parsley, minced
3 large eggs
Salt and freshly ground black pepper
1 cup Parmesan cheese, grated or shredded
1 cup bread crumbs

Instructions
1. Preheat oven to 350*F. 

2. In a large saucepan, heat 3 tablespoons olive oil over medium heat.  Add onion and garlic, cook until soft and golden brown, about 5 minutes.  Add Swiss chard and parsley.  Cook, stirring occasionally, for 10 minutes or until chard is wilted and stems are soft.  Remove from heat and let cool. 

3. Break eggs into small bowl.  Season with salt and pepper.  Add Parmesan and mix with a whisk or a fork until well-blended.  Add the Swiss chard mixture to the eggs and stir to combine. 

4. Oil a 9-inch baking dish with the remaining olive oil.  Dust bottom of baking dish with 12 cup bread crumbs.  Carefully place the Swiss chard mixture into the pan.  Coat top with remaining Parmesan and then remaining bread crumbs. 

5. Bake until the top is golden brown, about 30 minutes. 

Swiss Chard Tart

Comments
This is a recipe from Mario Batali that I found while looking for something exciting to do with the first Swiss chard of the year.  The original recipe called for some extra steps, but this version is much more streamlined and fairly simple to bring together.  We did feel that there were too many bread crumbs in the topping, so next time I’d reduce the total bread crumbs to 34 cup. 

Art loved this and would have had seconds if we didn’t have gorgeous strawberries waiting for dessert.  I think it’s a great way to prepare chard and will revisit the recipe in the future. 

Shown here with Mom’s Chicken.

Internet - Mario Batali

Mock Tuna Salad

Ingredients
2 (15 ounces each) cans garbanzo beans, rinsed and drained (A.K.A. chickpeas.)
3 bunches green onion, cut into 14-inch thick slices
3 stalks celery, cut into 14-inch thick slices
2 teaspoons pickle relish (Finding relish that is HFCS-free is difficult.)
2-3 tablespoons mayonnaise
Salt and freshly ground black pepper, to taste

Instructions
1. Using fork or masher, mash beans to a rough and chunky consistency.  (This can also be done carefully in a food processor.  You want the beans to be rough, not smooth like hummus.)

2. Combine beans and remaining ingredients in a bowl.  Stir well and chill in refrigerator before serving. 

Mock Tuna

Comments
The other day I was looking for lunch ideas to take when I visit my brother, the vegetarian, later in May.  A friend suggested that I try this salad and it’s delicious!  The texture is similar to tuna salad and it’s pretty similar in taste thanks to all of the other ingredients, it’s just lacking the fishiness of the tuna.  You could easily modify this to suit your tastes, I might add cherry tomatoes next time or even cucumber.  For a vegan version, just use your favorite vegan mayonnaise substitute.  This will probably be my lunch for the rest of the week and I’ll be making a double batch later in the month when I visit my brother!

I like my salads to be chunky, if you don’t you should cut the onions and celery into smaller pieces.

Person - Gwen

Creamy Stovetop Macaroni and Cheese

Ingredients
1 pound elbow macaroni
4 tablespoons flour
1 teaspoon salt
14 teaspoon freshly ground black pepper
14 teaspoon paprika
14 teaspoon dry mustard
4 tablespoons unsalted butter
2 cups milk (I used 1%.)
2 cups shredded cheese (I used a mixture of sharp cheddar, Mexican blend, and mozzarella since that’s what I had.)

Instructions
1. Bring a large pot of salted water to boil over high heat and cook pasta as directed on package.  Drain.  Mix the flour, salt, pepper, paprika and dry mustard in a small bowl. 

2. In a large saucepan over low heat, melt butter.  Once butter has melted, add the flour mixture and stir to combine.  Continue stirring and slowly add the milk.  Increase the heat to medium and simmer, stirring often, to thicken the sauce.  Once thickened, remove from heat and add the cheese.  Stir until cheese has melted.  Add the pasta to the sauce and stir to coat. 

mac and cheese

Comments
Stovetop macaroni and cheese is just about the easiest thing to make.  I’m not sure why it took seeing the recipe on the Amanda’s Cooking blog to inspire me to make it!   The recipe is your basic Béchamel with cheese – a Mornay sauce.  You can use any cheese you’d like and have around. 

I’ve been fighting the urge to get a box of the Kraft stuff every time I’ve gone to the store in the last 6-7 weeks.  This is infinitely better and my macaroni and cheese craving has now been sated.

Internet - Amandas Cookin

Chicken and Broccoli Stir-Fry

Ingredients
3-4 boneless, skinless chicken breasts, cut into bite-size cubes
2 cloves garlic, minced
1 inch fresh ginger, minced
1 tablespoon soy sauce
1 tablespoon sugar
1 tablespoon plus 1 teaspoon cornstarch
1 14 teaspoons kosher salt
1 teaspoon sherry
1 tablespoon sesame oil
13 cup chicken broth
3 tablespoons vegetable oil
1 pound broccoli, cut into florets and stems cubed
Freshly ground black pepper

Instructions
1. Toss the chicken pieces, half the garlic and ginger, soy sauce, sugar, 1 teaspoon cornstarch, 1 teaspoon salt, sherry, and sesame oil in a bowl.  Marinate at room temperature for 15 minutes.  Mix remaining cornstarch with chicken broth in a small bowl. 

2. Heat 1 tablespoon of vegetable oil in a large skillet over high heat.  Add broccoli, remaining garlic and ginger, and 2 tablespoons water.  Stir-fry for 3 minutes until bright green and still crisp.  Transfer to a plate and season with salt and pepper. 

3. Add remaining vegetable oil to skillet and heat over high heat.  Add the chicken and marinade.  Stir-fry until the chicken begins to brown, about 4 minutes.  Return broccoli to skillet and stir to heat through.  Stir in cornstarch mixture and bring to a boil to thicken.  Serve with rice. 

Chicken and Broccoli Stir-Fry

Comments
Food Network’s How to Boil Water cookbook is my current favorite recommendation for new cooks.  The descriptions and photographs of techniques are great and all the recipes I’ve tried have been simple yet flavorful and tasty.  This recipe certainly followed the trend.  I served this with brown rice since I’m working on transitioning to brown rice instead of white rice.  Except for risottos.  So far I’m liking the change.

How to Boil Water