Recipes

Salmon with Mustard Dill Sauce

Ingredients
4 tablespoons Dijon mustard
2 tablespoons Country Dijon Mustard
Juice of 1 lemon
2 teaspoons olive oil plus more for salmon
2 tablespoons fresh dill, minced, or 2 teaspoons dried dill
2 cloves garlic, minced
4 (6 ounces each) salmon fillets
Salt and freshly ground black pepper

Instructions
1. Preheat oven to 400*F.  Line a baking sheet with foil and spray with cooking spray. 

2. Combine mustards, lemon juice, 2 teaspoons olive oil, dill and garlic in a small bowl. 

3. Place salmon on prepared baking sheet, skin-side down. Season with salt and pepper and drizzle about 1 teaspoon olive oil over each salmon piece.  Bake for 10 minutes.  Remove from oven, tent with foil, and let rest for 10 minutes before serving with sauce. 

Fish

Comments
This recipe is from Life’s Ambrosia.  Lance and I both found the fish to be a bit too dry, so that’s something I should work on in the future.  I seem to have trouble getting salmon perfectly cooked in the oven – it’s much easier in a skillet.  The solution here is for me to actually look up temperatures and use my handy-dandy thermometer until I get the timing right. 

The sauce, however, was fantastic.  It was very strong with garlic and mustard.  Not the sort of sauce you want to glop on top of the fish before testing first! 

Shown here with Mashed Potato and Turnip Cakes with Onions and Kale.

Internet - Life’s Ambrosia

Swiss Chard Gratin

Ingredients
5 tablespoons unsalted butter
1 cup fresh white bread crumbs, from two slices white bread
3 ounces Gruyère cheese, grated (1 cup)
1 clove garlic, minced
1 teaspoon Herbes de Provence
18 teaspoon nutmeg, freshly grated
1 cup chicken broth
12 cup half and half
1 tablespoon all purpose flour
1 medium onion, finely chopped
3 pounds Swiss chard, leaves and stems separated and both cut into 1-inch pieces
1 pound spinach, coarse stems discarded, leaves coarsely chopped

Instructions
1. Preheat oven to 400*F. 
2. Melt 2 tablespoons butter and toss with bread crumbs, cheese, garlic, herbs, half of nutmeg, and salt and pepper to taste in small bowl. 

3. Boil broth in a small saucepan until reduced by half.  Add half and half. 

4. Melt 1 tablespoon butter in small saucepan over medium heat and stir in flour.  Cook, stirring, 1 minute.  Then stir in broth mixture and boil, stirring, 1 minute.  Season sauce with salt and pepper. 

5. Cook onion in remaining 2 tablespoons butter in a large pot over medium-low heat, stirring, until softened.  Add chard stems, remaining nutmeg, and salt and pepper to taste.  Cook, stirring, until vegetables are tender but not browned, about 8 minutes. 

6. Increase heat to medium-high and add chard leaves and spinach by large handfuls, stirring, until all greens are wilted.  Season with salt and pepper. 

7. Transfer vegetables to a colander to drain well and press out liquid with back of a large spoon.  (Alternately, you could salad spin the vegetables to remove as much liquid as possible.)  Toss vegetables with sauce and transfer to a buttered baking dish, spreading evenly. 

8. Top vegetables with bread crumbs and bake until edges are bubbling and topping is golden, about 20 minutes. 

Swiss Chard Gratin

Comments
This recipe is from epicurious.com and I greatly enjoyed it.  The guys found it palatable, but they’re not really loved of greens in the first place.  This is sad. I thought the dish, thanks to the great flavors in the topping, was tasty and I’d be willing to make it again if anyone else wanted to eat it with me.  Between you and me, blog readers, I’m quite content just to have Cheater Greens whenever we get greens in our box.  And not just for the bacon!

Shown here with sautéed goat chops.  Teeny, tiny, sautéed goat chops.

Internet - Epicurious

Almost No-Knead Sourdough Bread

Ingredientssliced bread 5 ounces whole wheat flour (about 1 cup)
10 ounces bread flour (about 2 cups)
14 teaspoon yeast
1 12 teaspoons table salt
7 ounces water (34 cup plus 2 tablespoons), at room temperature
3 ounces mild-flavored lager (14 cup plus 2 tablespoons), such as Budweiser
2 12 ounces sourdough starter (14 cup)
1 tablespoon white vinegar

Instructions
1. Whisk flour, yeast, and salt in large bowl. Add water, beer, starter, and vinegar. Using rubber spatula, fold mixture, scraping up dry flour from bottom of bowl until shaggy ball forms. Cover bowl with plastic wrap and let sit at room temperature for 6 hours.

2. Lay 12- by 18-inch sheet of parchment paper inside 10-inch skillet and spray with nonstick cooking spray. Transfer dough to lightly floured work surface and knead 10 to 15 times. Shape dough into ball by pulling edges into middle. Transfer dough, seam-side down, to parchment-lined skillet and spray surface of dough with nonstick cooking spray. Cover loosely with plastic wrap and let rise at room temperature until dough has double in size and does not readily spring back when poked with finger, about 1 to 1 12 hours.

3. About 30 minutes before baking, adjust oven rack to lowest position, place 6- to 8-quart heavy-bottomed Dutch oven (with lid) on rack, and heat oven to 500*F. Lightly flour top of dough and, using razor sharp blade or sharp knife, make one 6-inch long, 12-inch-deep slit along top of dough. Carefully remove pot from oven and remove lid. Pick up dough by lifting parchment overhang and lower into pot (let any excess parchment hang over pot edge). Cover pot and place in oven. Reduce oven temperature to 425*F and bake covered for 30 minutes. Remove lid and continue to bake until loaf is deep brown and instant-read thermometer inserted into center registers 210*F, 20 to 30 minutes longer. Carefully remove bread from pot; transfer to wire rack and cool to room temperature, about 2 hours.

Cold Rise Variation: For a stronger sourdough flavor, you can refrigerate the dough during step #1 after mixing it.  Ten hours before you plan on baking the bread, remove the dough from the fridge and continue with step #1 but allow the dough to sit at room temperature for 8 hours instead of 6.  Continue with the rest of the recipe as printed.  In theory, the longer the dough chills the stronger the sourdough flavor will be.

sourdough!

Comments
After lots of experimentation, I finally spent time reading up on no-knead sourdough bread baking.  I found that the solution was a very simple one, and that I just needed to reduce the rest and rise times.  That knowledge, and a few tweaks, gave me what I feel is absolutely perfect sourdough bread.  I had lots of fun with the experimentation, even if most of it did prove to be in vain!

Person - Gwen

Roasted Turnips

Ingredients
1 12 pounds turnips, trimmed, peeled and cut into 1-inch cubes
1 tablespoon unsalted butter, melted
Salt and pepper

Instructions
1. Preheat oven to 500*F. 

2. In a medium bowl, toss the turnips with the butter and season them generously with salt and pepper. Spread the turnips evenly onto a roasting pan with room between the pieces. Roast, 25-30 minutes, or until the turnips are tender and brown in spots.  Toss halfway through cooking for even browning. 

turnips

Comments
This recipe is from Cookthink.  I was hoping that the turnips would crisp up like potatoes do when roasted, but they remained pretty soft.  The butter did add a nice sweetness to the turnips and they were tasty, but I don’t think I’ll be using this preparation in the future unless I can figure out how to get them to crisp up a bit – maybe pan frying would be more effective? 

Shown here with Grilled Marinated Chuck Steak.

Internet - Cookthink

Orzo Baked with Greek Cheeses

Ingredients
16 ounces chicken broth
Salt, to taste
1 pound orzo pasta
12 cup half and half
14 cup olive oil
12 pound feta cheese, crumbled
1 tablespoon fresh dill, chopped, or 1 teaspoon dried dill
Pepper, to taste
13 cup kasseri or Romano cheese, grated (I always use Romano since I can never find kasseri.)

Instructions
1. Preheat oven to 350*F. 

2. Pour broth and an equal amount of water into a large pot.  Add salt and bring to boil.  Stir in orzo and boil until just tender.  Drain well and return to pot.  Mix in half and half, oil, feta, and dill. Season with salt and pepper.  Transfer mixture to 2-quart baking dish. 

3. Top with kasseri cheese.  Bake until heated through, about 40 minutes. 

Note: This can be prepared through step 2 up to a day in advance and kept in refrigerator.  Allow to come to room temperature before proceeding with step 3. 

Orzo Baked with Green Cheeses

Comments
When I first made lamb many years ago, I made this dish to go along with it.  It’s sort of like adult macaroni and cheese and I’ve loved it ever since.  In fact, this was probably one of the first (recipes I ever made from epicurious.com.  This time I used sheep feta from the West Chester Growers Market, but I’ve used regular feta every previous time and it’s delicious.  The only thing I might ever change would be an increase in the feta content. 

Shown here with Grilled Marinated Leg of Lamb.

Internet - Epicurious

Grilled Marinated Leg of Lamb

Ingredients
12 cup olive oil
14 cup fresh lemon juice
4 cloves garlic, smashed
1 tablespoon dried oregano
2 teaspoons salt
1 teaspoon black pepper
1 (4 12- to 5-pound) boneless leg of lamb, butterflied and trimmed of fat

Instructions
1. Combine oil, lemon juice, garlic, oregano, salt and pepper in a large ziptop bag (or other sealable container). Add lamb, turn to coat, and seal, pressing out as much air as possible.  Marinate in refrigerator overnight, at least 8 hours and up to 24 hours. 

2. 1 hour before grilling, remove lamb from refrigerator to bring to room temperature. 

3. Prepare grill for grilling.  Remove lamb from marinade (and discard marinade).  Run 2-4 skewers lengthwise through lamb to make for easier turning.  Grill for 10-15 minutes, or until thermometer reaches 125*F to 130*F for medium-rare. 

4. Transfer lamb to cutting board, remove skewers, and rest, loosely covered with foil, for 20 minutes.  Slice thinly across the grain. 

Lamb

Comments
The first time I made a leg of lamb, about 5 or 6 years ago, it was fantastic.  We loved it.  I’ve tried to make legs of lamb since then with poor results that usually involved the slow cooker.  By “poor results” I mean that I tend to be the only one who enjoys it!  I wanted something with lamb to serve with Orzo Baked with Greek Cheeses so I found this recipe and decided to give leg of lamb yet another attempt. 

I am so glad I did!  This lamb was fantastic.  It was juicy, flavorful, and I think Art and Lance are now sold on me making leg of lamb every so often, as long as it’s grilled.  The cut of meat was a little uneven, so the doneness varied significantly, but I loved it all. 

Shown here with Orzo Baked with Greek Cheeses.

Internet - Epicurious

Grilled Marinated Chuck Steak

Ingredients
12 cup balsamic vinegar (I used pomegranate balsamic vinegar, any would work.)
14 cup soy sauce
14 cup olive oil
1 envelop Lipton’s onion soup mix
2 chuck steaks (Mine totaled about 3 pounds with bone.)

Instructions
1. Mix all ingredients together in a large ziptop bag or other sealable container.  Refrigerate for at least 2 hours but no more than 10, turning occasionally. 

2. Grill.  For me this step involved heating the grill to a high heat, searing the meat for 1-2 minutes per side, removing the steaks and reducing the grill’s heat to a lower temperature and then grilling 3-4 minutes per side until done and around 140*-145*F.  You probably know your grill better than I do!

Chuck Steak

Comments
This is the first real steak that we’ve made from our grass-fed cow stockpile!  Chuck steak is not a great cut of meat but it sure worked well on the grill and was super flavorful.  The steak shown in this picture was huge and got cut up into about 4-5 pieces for serving after the picture was taken.  We’re still getting the hang of grilling, but every attempt comes out better than the previous one. 

The marinade was great and had the added bonus of using balsamic vinegar.  I’m pretty sure that I could drink balsamic straight and be a happy camper so I’ve got quite a stockpile of various balsamics should the need to live off of it ever arise.  I used the Lipton soup mix because I happened to have a packet from a previous cooking experiment.  A simple mixture of salt, pepper, and garlic would have worked well also.  Art suggested that, in the future, I reduce the marinade down and make a sauce with it because it was so tasty, so I might consider that!

Shown here with Roasted Turnips.

Unknown

Slow Cooker Cabbage (or Collard Greens) Rolls

Ingredients
24 leaves cabbage (I used Jersey Wakefield which are large and dark green.)
2 cups cooked rice (I used a brown and wild rice blend, since it’s what was in the fridge.)
2 eggs, beaten
12 cup milk
12 cup onion, minced
2 pound ground beef (Use the leanest you can get since it cooks in the slow cooker.)
2 12 teaspoons salt
2 12 teaspoons ground black pepper
2 (15 ounces each) cans tomato sauce
4 tablespoons brown sugar
4 tablespoons lemon juice
4 teaspoons Worcestershire sauce

Instructions
1. Bring a large pot of water to a boil. Boil cabbage leaves 2 minutes; drain.

2. In large bowl, combine rice, eggs, milk, onion, ground beef, salt, and pepper. Place about 14 cup of meat mixture in center of each cabbage leaf, and roll up, tucking in ends. Place rolls in slow cooker.

3. In a small bowl, mix together tomato sauce, brown sugar, lemon juice, and Worcestershire sauce. Pour over cabbage rolls.

4. Cover, and cook on LOW 8 to 9 hours.

Cabbage Rolls

Comments
This recipe is a pretty ubiquitous one, I found the inspiration for this version at allrecipes.com.  I thought it looked like a tasty way to use up the bunch of cabbage I got from the CSA this week.  I did have some trepidation since slow cooker meals always seem to be so hit or miss for me.  Lance and I both enjoyed these cabbage rolls!  The meat filling was flavorful and each roll was hearty.  I’m glad that I took the advice from reviews to increase the sauce ingredients – it worked well. 

I used grass-fed ground cow which is extremely lean.  You should use the leanest cow you’ve got access to.  I’m sure that any lean ground meat would work well in this recipe!

Edit: So… apparently what I thought was cabbage was actually a bunch of collard greens.  Ooops.  This was still fantastic and it’s nice to know that, at least for this recipe, they’re interchangeable!

Internet - allrecipes

Tilapia with Balsamic Butter Sauce

Ingredients
14 cup balsamic vinegar
1 garlic clove, minced
1 tablespoon olive oil
4 (6-ounce) tilapia fillets
12 cup unsalted butter, cut into 8 pieces

Instructions
1.  Simmer vinegar and garlic in small saucepan over medium heat until vinegar has reduced to thick syrup, about 5 minutes.  Remove from heat. 

2. Heat olive oil in large skillet over high heat.  Season fish with salt and pepper.  Sauté until golden, about 2 minutes per side, working in batches if necessary. 

3. Rewarm balsamic syrup over low-heat.  Whisk in butter 1 piece at a time.  Season with salt and pepper and serve over tilapia. 

tilapia

Comments
The sauce comes from an epicurious.com recipe.  I had already planned my own side, so I just used the recipe for the sauced fish component and ignored the rest.  Hindsight 2020, I probably should have reduced the sauce amount to take that into account. 

This is an extremely simple and quick tilapia preparation.  Even with cooking the fish in two batches due to using a smaller skillet, this was on the table in less than 20 minutes.  I opted to use the delicious Pineapple Balsamic Vinegar that I picked up recently and it was a fantastic compliment to the mild (i.e., non-existent) flavor of the tilapia. 

The only thing I would change in the future is the butter to vinegar ratio.  I don’t know if it was due to the vinegar I used or what, but I would have preferred the sauce to be much less buttery and much more vinegary.  Next time I might increase the vinegar to 34 cup and decrease the butter to 38 cup.  Or something along those lines.  This was so easy, though, that I’ll have no issues with trying it again.  And often! 

Shown here with Balsamicy Pasta Caprese.

Internet - Epicurious

Taco Pizza

Ingredients
For the pizza dough
2 teaspoons yeast
2 teaspoons sugar
1 12 cup warm water
12 cup olive oil
1 teaspoon salt
4-4 12 cups flour (You can use up to 2 cups of whole wheat flour, the rest should be all purpose.)

For assembly
1 pound ground beef or turkey
1 packet taco seasoning
1 (16 ounces) can refried beans, optional (I used vegetarian refried beans since I’ve always liked them the best.)
1 bunch green onions, sliced
1 cup red taco sauce (I used Old El Paso since it’s the only brand my store carried that didn’t have HFCS.)
2 cups cheddar cheese or Mexican cheese blend, shredded
3-4 plum tomatoes, diced, or 1 pint grape tomatoes, halved
2 cups lettuce, shredded
Black olives, sliced, optional
Sour cream, for serving

Instructions
1. For the dough: Dissolve yeast and sugar in warm water and let sit for five minutes.  Add oil and salt, stir to mix.  Add flour one cup at a time, stirring to combine completely.  Dough should be a little sticky but easy enough to work with that it doesn’t stick all over your hands.  Knead dough for five minutes.  Place in a greased bowl and let rise for an hour. 

2. Punch down dough and let rest five minutes.  Divide dough in half and roll, stretch or press into two 12-inch rounds.  Place each round on pizza pan or parchment paper if using pizza stone. 

3. Preheat oven to 500*F.  If using pizza stone, preheat that as well. 

4.  Brown meat in a large skillet over medium heat.  Add taco seasoning and cook according to package directions.  Add refried beans, if using, and stir to soften and mix.  Add green onions and stir to combine. 

5. Spread 12-1 cup taco sauce onto each round of dough, depending on how saucy you like your pizzas.  Spread half of meat-bean mixture on top of each pizza.  Top each pizza with half of the cheese.  Bake for 8-12 minutes, or until cheese is melted and dough is fully cooked. 

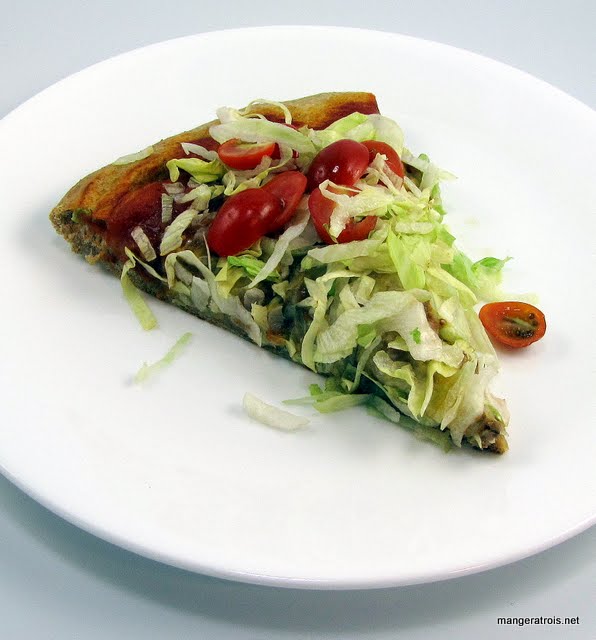
6. Allow pizza to cool for five minutes then top with shredded lettuce, tomatoes, and olives, if using.  Serve with sour cream and any remaining taco sauce.

To cook from frozen: Preheat oven to 400*F and bake until cheese is bubbly and pizza is heated through, about 20-30 minutes.

Note: I used two disposable 12-inch pizza pans because I don’t seem to own proper pizza pans.  I should rectify that some day.  I preheated my pizza stone in the oven and cooked the pizzas one at a time on the stone in a disposable pan.

Taco Pizza

Comments
This recipe is from my aforementioned awesome sister-in-law.  She mentioned the recipe on facebook and it sounded right up my alley so she was sweet enough to share it with me!  It was scrumptious.  I used half whole wheat flour as per her suggestion and that worked perfectly.  The dough had a nice texture and flavor, plus I can tell myself it’s healthy.  I had to use grape tomatoes instead of plum tomatoes since the plum tomatoes at our store were not looking so great. 

One of the nice things about this pizza is that it’s easy enough to make through step 5 and then serve all of the other ingredients as toppings table side, if you wanted to make it more like a taco night.  Avocado would probably be a great topping as well for those who love it, like me. 

The recipe makes two good-sized pizzas and the three of us completely polished off one of them.  I wrapped the second one up without the lettuce and tomatoes and have it in the freezer to reheat for a future meal.  The pizza was definitely a winner and I already have visions of making more pizzas like this in the future.  It would also be extremely easy to vegetarianize by omitting the meat or replacing it with soy crumbles and using vegetarian refried beans.

Person - Nikki Little