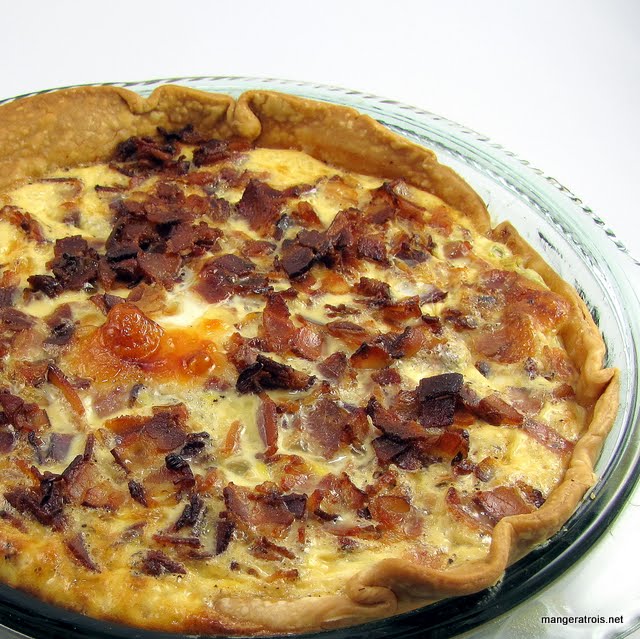
Recipes

Bacon Swiss Quiche

Ingredients
Pastry for two 9-inch pies (I use Pillsbury, but you could make your own if desired.) 
6 eggs
3 cups milk (I use 1%.)
1 teaspoon Worcestershire sauce
1 teaspoon salt, or to taste
12 teaspoon pepper, or to taste
3 cups swiss cheese, shredded or chopped
24 ounces center cut bacon, chopped
1 cup green onions, thinly sliced

Instructions
1. Preheat oven to 425*F.

2. Roll the pastry into an 11-inch circle. Line a 9-inch pie dish with the rolled dough. Weigh down the pastry using pie weights or dried beans to prevent the crust from rising or just poke it with a lot of holes and press it down after it pre-bakes. Repeat with second pie shell.  Bake 10 minutes. Remove from oven and remove weights.

3. Decrease oven temperature to 350*F.

4. In a skillet over medium heat, saute bacon until just crisp.  Drain on paper towels.  In a large bowl, beat the eggs lightly. Add the milk, Worcestershire sauce, salt, and pepper; beat until combined.

5. Sprinkle half of the cheese into the bottom of the pie shell. Add half of the bacon and green onions, and toss gently to combine. Pour in half of the egg mixture.  I just eyeball this, it doesn’t need to be an exact division. 

6. Bake 50 to 60 minutes or until puffy and slightly browned on top. Let stand 10 minutes before slicing.

Bacon Swiss Quiche

Comments
This recipe can easily be halved to only make one quiche and, the recipe I’ve adapted is indeed written for only one quiche.  However, I’m bad at following measurements and always end up with too much filling, so now I just make two quiches whenever I make quiche.  Quiche freezes wonderfully after baking and cooling and is easy to reheat in an oven at 350*F for 45 minutes or so without needing to be thawed.  Making two means I can freeze one for later and have an easy dinner.   

Quiche is very easy and versatile.  The basic preparation method is always the same.  Mix up milk and egg mixture, put quiche ingredients into pie shell, stir and pour milk mixture over.  Then bake until done.  There are infinite variations to try and enjoy.

1,000 Vegetarian Recipes

Farmers Market Stir-Fry #1

Ingredients
1 teaspoon cornstarch
14 cup cold water
14 cup plum sauce
2 inches fresh ginger, minced
4 cloves garlic, minced
1 tablespoon soy sauce
14 teaspoon crushed red pepper flakes

1 flank steak (2-3lb)
oil for stir frying (I used Safflower since it is the only non-olive oil I had on hand)
handful of baby carrots (enough to cover the bottom of the wok)
8 ounces mushrooms, sliced
1 bunch green onions, sliced
3 small baby bok choi, sliced

Instructions
1. In a small bowl, whisk cornstarch and cold water until smooth. Stir in the plum sauce, ginger, garlic, soy sauce and pepper flakes; set aside.  Or put all of the sauce ingredients into an appropriate container and blend them with your handheld blender.  I opt for this method if I don’t want to take the time to chop the garlic and ginger.  

2. Cut flank steak in half lengthwise and then cut into thin strips against the grain.  Heat your wok (or large skillet) over high heat then add 1-2T of oil. Stir-fry beef in oil until no longer pink; remove and keep warm.

3. In the same pan, adding more oil if necessary, stir-fry the carrots for a minute or two.  Then add mushrooms and green onions for another minute or two.  Add bok choi last and stir until it wilts slightly.  Return beef to the pan. Whisk the plum sauce mixture; stir into skillet. Cook and stir until slightly thickened.

4. Serve over rice.

Stir Fry #1

Comments
I get the feeling we’ll be eating a lot of stir-fry this summer due to the CSA and Farmer’s Market.  The method for stir-frying is pretty much always the same.  Stir-fry meat and remove.  Stir-fry veggies in order from longest cooking time to shortest.  Add meat back to wok and add sauce to coat.  The length you cook the veggies will depend on how crisp you want them to be.  

This sauce is pretty spicy due to the ginger, garlic and red pepper flakes, it compliments the flank steak very well.  While you could use any beef you wanted to, I’ve been finding that flank steak really works well for stir-frys, so that’s what I tend to keep around in the freezer. 

And, yes, that picture is on a small plate since I forgot to take a picture until after we’d already finished eating and didn’t want to dirty a big plate just to take a picture.

Unknown

Ham and Cheese Macaroni Bake with Peas

Ingredients
1 pound elbow macaroni
1 pound lean ham, chopped
1 12 cups frozen peas
Cooking spray
12 cup onion finely, chopped
3 cups milk (I used 1%.)
1 cup cheddar cheese, shredded (I used 2%.)
1 cup Swiss cheese, shredded (I used 2%.)
34 teaspoon salt
14 teaspoon freshly ground black pepper
18 teaspoon ground red pepper
2 slices bread (I used whole wheat.)
2 tablespoon butter, melted

Instructions
1. Preheat oven to 400°F.

2. Cook pasta in boiling water 6 minutes. Drain and rinse with cold water; drain. Combine pasta, ham, and peas in a large bowl.

3. Heat a medium saucepan over medium heat. Coat pan with cooking spray. Add onion to pan; cook 4 minutes, stirring frequently. Add milk; bring to simmer. Remove from heat; stir in cheeses, salt, and peppers. Pour cheese mixture over pasta mixture; stir to coat. Spoon pasta mixture into a 13x9-inch baking dish coated with cooking spray.

4. Place bread in a food processor; pulse 10 times or until coarse crumbs measure 1¼ cups. Combine bread crumbs and butter in a bowl. Arrange bread crumb mixture evenly over pasta mixture. Bake at 400°F for 20 minutes or until lightly browned.

Creamier Version: If you want this to be creamier, add in three tablespoons of butter with the onion in step 3.  After the onion softens, add three tablespoons of flour and stir for a few minutes until the butter is absorbed.  Proceed with the rest of the recipe as written. 

Ham and Cheese Macaroni Bake with Peas

Comments
This is a recipe from Cooking Light’s 2009 Annual and yields a very wet macaroni and cheese.  It’s almost more of pasta with a thin sauce instead of my mental picture of how macaroni and cheese usually is.  Still, it’s scrumptious and has a lovely flavor that isn’t drowning in cheese.

Cooking Light 2009