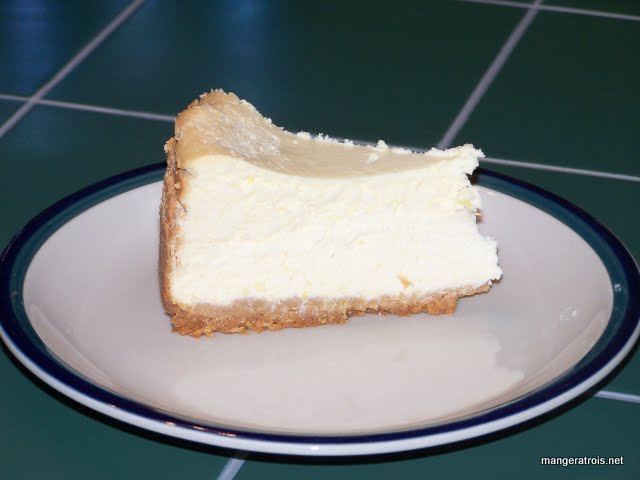
Recipes

Lemon Ricotta Cheesecake

IngredientsSlice For the crust
1 12 cups crushed vanilla wafers (I used a 7.5oz bag of Barbara’s Vanilla Animal Crackers because all the vanilla wafers I could find at the store had HFCS)  
1 tablespoon lemon zest
13 cup melted butter

For the cheesecake
16 ounces cream cheese, softened
15 ounces ricotta cheese
1 14 cups sugar
14 cup cornstarch
4 eggs
2 cups half and half
13 cup lemon juice
4 teaspoons lemon zest
2 teaspoons vanilla extract

Instructions
1. Preheat oven to 325*F.  

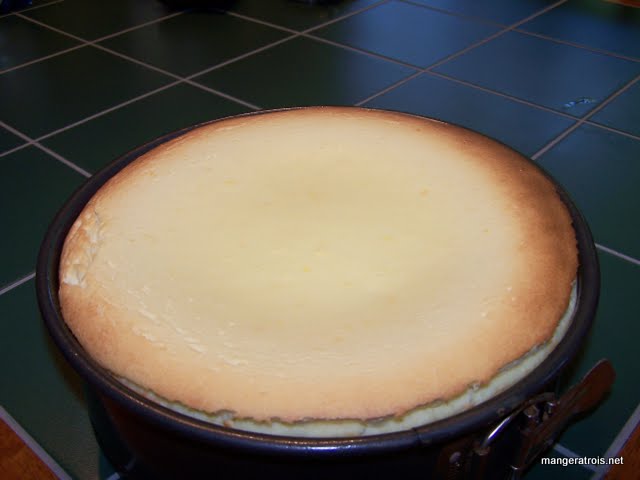
2. In a bowl, combine wafer crumbs, butter and lemon peel. Press onto the bottom of a greased 9-in. spring-form pan. Bake for 15 minutes or until lightly browned.  Cool.

3. In a large bowl, beat cream cheese and ricotta until smooth. Combine sugar and cornstarch; add to cheese mixture and beat well. Add eggs and cream, beating on low speed just until combined. Beat in lemon juice, peel, and vanilla until blended. Pour into crust. Place pan on a baking sheet.

4. Bake for 70-80 minutes or until center is almost set. Cool on a wire rack for 10 minutes. Carefully run a knife around edge of pan to loosen; cool 1 hour longer. Refrigerate overnight. Remove sides of pan and serve.  

Lemon Ricotta Cheesecake

Comments
It’s still cooling, I’ll add comments tomorrow.  :)

Added Later
We all tried a slice of this after it had cooled for about 3-4 hours and, while the flavors were nice, it wasn’t that amazing.  We tried it again after it had chilled for a full 12-14 hours and it was amazing.  Please don’t neglect the “Refrigerate overnight” step, it’s rather important.  The lemon and ricotta flavors are both prevalent throughout and noticeable.  This cheesecake is creamy, but it’s also very light and airy compared to a normal creamy cheesecake. 

It’s safe to say that Art loved it, since he managed to eat 34 of the cake all by himself over the course of three days.  This one is a keeper.

Unknown

Chicken with Goat Cheese Sauce

Ingredients
3-4 boneless, skinless chicken breasts, sliced lengthwise to make 2 cutlets each
14 teaspoon salt
14 teaspoon freshly ground black pepper
1 tablespoon olive oil
2 tablespoon dry white wine
1 cup chicken broth
4 thyme sprigs
2 ounces soft goat cheese
1 teaspoon fresh thyme leaves

Instructions
1. Sprinkle chicken evenly with salt and pepper.

2. Heat oil in a large nonstick skillet over medium heat. Add chicken; cook 6 minutes on each side or until done. Remove chicken from pan; keep warm.

3. Add wine to pan; bring to a boil, scraping pan to loosen browned bits. Cook until mixture is reduced to 1 tablespoon (about 1 minute). Add broth and thyme sprigs; cook until mixture is reduced to 12 cup (about 5 minutes). Remove from heat; discard thyme sprigs.  Add goat cheese and stir to melt.  Garnish with fresh thyme leaves.  

Chicken with Goat Cheese Sauce

Comments
This is from Cooking Light’s 2006 Annual.  The first time I made it Lance had seconds and Art had thirds, so it’s safe to say that it’s a winner.  If you like thicker sauces, let the sauce reduce even more after adding the broth.

The first time I made this, I recall wishing the sauce was a bit thicker.  As you can tell from this picture, I think I made it a bit too thick this time!  Edit: I’ve since updated the picture to a sauce with a better consistency.

Shown here with Penne with Roasted Grape Tomatoes and Fresh Basil.

Cooking Light 2006

Chicken Parmesan

Ingredients
4 large eggs
Salt and freshly ground black pepper, to taste
3 cups bread crumbs, seasoned or plain
3-4 boneless, skinless chicken breasts, pounded flat or cut lengthwise to make 2 cutlets each
14 cup olive oil
7 cups tomato sauce (I use two 26oz. jars of store-bought pasta sauce, usually Barilla)
12 cup Parmesan cheese, grated

Instructions
1. Preheat the oven to 350 degrees F.

2. Place the eggs in a bowl and whisk with salt and pepper. Place the bread crumbs on a large plate. Dip the chicken in the egg and then dredge in the bread crumbs. Re-dip in the egg a second time and then dredge in the bread crumbs again.  (I’ve found that using a shallow container, such as Gladware, can work very well for this.)

3. In a large, heavy skillet, heat the olive oil over moderate heat. Brown the double-dipped chicken in the hot oil for 3 to 4 minutes on each side, or until golden brown. Remove the chicken and drain on paper towels.

4. Pour about 2 cups of the sauce in the bottom of a large gratin dish or large ovenproof, glass baking dish. (I use a 9x12-inch baking dish.)  Place the browned chicken breasts on top of the sauce and cover with the remaining sauce. Sprinkle with the cheese and bake on a rack in the middle of the oven for 15 minutes, or until the sauce and cheese are bubbling.

5. Serve hot with pasta, and sprinkle with parsley, if desired.  

Note: Feel free to add more or less sauce depending on your desired sauce level.  

Chicken Parmesan

Comments
When I was still figuring out Lance’s food likes and dislikes, I found this recipe online because everyone loves Chicken Parmesan, right?  All three of us did, indeed, love this and I’ve been making it ever since.  Chicken Parmesan is probably Art’s top comfort food and whenever I go out of town he requests that I make a double recipe of this so he’ll be able to have Chicken Parm every day I’m gone.  The picture shows the recipe made with four pounded breasts. 

I serve this with whatever long noodley pasta I happen to grab at the store.

Internet - Food TV

Chicken Baked in White Wine Marinade

Ingredients
1 cup white wine
1 cup onion, sliced vertically
1 teaspoon fresh thyme, chopped
3-4 boneless, skinless chicken breasts (1 12-2 pounds)
2 cloves garlic, minced
1 bay leaf
12 teaspoon salt
14 teaspoon freshly ground black pepper

Instructions
1. Combine first 6 ingredients in a large zip-top plastic bag; seal. Marinate in refrigerator 4 hours or up to 24 hours, turning occasionally.  (I marinated mine for about 18 hours.)

2. Preheat oven to 375*F.

3. Place chicken in an 12x9-inch baking dish. Pour marinade over chicken. Cover and bake at 375*F for 20 minutes. Uncover and bake an additional 40 minutes or until done.  Discard bay leaf and marinade. Sprinkle chicken evenly with salt and pepper and serve.  

Chicken Baked in White Wine Marinade

Comments
This is another recipe from Cooking Light 2009’s Annual.  Apparently this was the week of the marinade since it seemed like half the recipes I made this week involved an overnight marinade.  Please take this into account when planning meals, nothing is worse than going to start dinner at 5pm only to realize that you’ve got to marinate your meat overnight!  

This was very flavorful and moist it was, however, a bit, well, dull.  Be sure to serve this with something exciting so it’s not just a piece of chicken on a plate.  It would pair well with a nice risotto or pilaf, for example.

Cooking Light 2009

Tempura Squash

IngredientsPatty Pans 1 cup all purpose flour
14 teaspoon salt
1 to 1 18 cups chilled seltzer or club soda
Pattypan squash or other summer squash (I used these 3 and probably had enough batter for 3 more of the same size.  The table tiles are 6”x6” to give you an idea of scale)  
Oil for frying.  (I used Safflower since it was the only non-olive oil I had in the house.  Vegetable oil works fine)

Instructions
1. In a bowl whisk together flour and salt. Whisk in 1 cup seltzer, whisking until smooth and let batter stand 10 minutes. If necessary, thin batter with enough of remaining seltzer to reach consistency of crepe batter.  

2. Heat in a deep pot over medium-high heat.  I didn’t have a lot of oil at my disposal, so I ended up using a small saucepan with 1 12 cups of oil.  

3. Slice squash thinly into discs or half moons.  Dip squash into the batter to evenly coat.  

4. Fry squash in small batches, allowing plenty of room so the pieces do not stick to each other.  Fry until light golden brown.  Drain on a rack over paper towels.  

Tempura Patty Pans

Comments
Pattypans are very similar in taste to zucchini and yellow squash.  They’re also beautiful.  Battering and frying them was the recommendation I got from the farmer so I decided to give this a try.  This is a pretty generic tempura recipe that you could easily use for many different types of vegetables.

Shown here with Southwest Asian Grilled Flank Steak and Soy Dipping Sauce.

Unknown

Southwest Asian Grilled Flank Steak

Ingredients
3 tablespoons fresh lime juice (i seem to have miscalculated my lime needs for the week, so i was out of fresh limes.  i used bottled lime juice and it seems to have worked well enough.  i’m sure fresh juice would be even better.)
1 tablespoon sugar
1 tablespoon fish sauce
2 teaspoon Sriracha
12 teaspoon ground coriander
2 cloves garlic, minced
1 pound flank steak, trimmed
Cooking spray
14 teaspoon salt

Instructions
1. Combine first 6 ingredients in a large zip-top plastic bag. Add steak; seal and marinate in refrigerator 24 hours, turning occasionally.  Note: Since I tend to buy whole spices, and also like short cuts, I used my hand blender to make the marinade. I just tossed in the garlic cloves and whole coriander and let the blender do the work.  A hand/stick/immersion blender is a very useful kitchen tool.  So useful, I even bought one for my mom! 

2. Prepare grill (or griddle) to medium-high heat.

3. Remove steak from marinate; discard marinade.

4. Place steak on grill rack (or griddle) coated with cooking spray; grill 4-6 minutes on each side or until desired degree of doneness. Remove steak from grill; sprinkle with salt. Let stand 5 minutes. Cut across grain into thin slices. 

Southwest Asian Grilled Flank Steak

Comments
This recipe comes from Cooking Light’s 2009 Annual.  Flank steak is a rather new addition to our diets and I’m not sure why we weren’t eating it sooner.  It’s extremely flavorful and takes well to all sorts of marinades.  I would make some variety of flank steak on a weekly basis if the griddle wasn’t so annoying to clean.  I’ve got a Lodge cast iron griddle and, if you’re like me and don’t have a proper grill, it’s an acceptable substitute.  Just be sure to open a window in your kitchen since it can be quite smoky. 

Don’t let the ingredients scare you away.  It tastes neither fishy nor killer spicy from the fish sauce and sriracha.  I promise.

Shown here with Tempura Squash and Soy Dipping Sauce.

Cooking Light 2009

Smoked Salmon with Fresh Dill and Capers

Ingredients
1 12 tablespoons butter
1 12 tablespoons flour
3 cups half and half, divided
1 pound short pasta
1 12 limes, juiced
1 tablespoon fresh dill, chopped
1 tablespoon olive oil
1 cup onion, diced (I used green onion from the CSA)
1 tablespoon garlic, minced
1 yellow pepper, diced
12 cup white wine
8 ounces smoked salmon, chopped
4 tablespoons capers, drained and rinsed very well
Salt and pepper

Instructions
1. Bring a large pot of salted water to boil and cook pasta as directed on the package.  Drain and toss with dill and lime juice.  Set aside.  

2. In a small saucepan, melt the butter over low heat.  Add flour and stir or whisk until smooth.  Gradually stir in 2 cups half and half.  Increase heat to high and continue stirring until boiling.  Reduce heat to low and simmer for 10 minutes, stirring occasionally.  You’ve just made béchamel!

3. Heat olive oil in a large skillet over medium heat, then sauté the onions and yellow peppers until tender.  Add garlic and sauté for 1 minute more. Pour the wine into the pan, scrapping the bottom of the skillet to loosen any bits that have stuck on. 
Simmer until wine has reduced by half.

4. Combine vegetables with béchamel, remaining cup of half and half, smoked salmon, and capers.  Slowly bring to a boil.  

5. Season with salt and pepper to taste.

6. Add sauce to pasta and toss well to coat.  Serve and enjoy.  

Smoked Salmon with Fresh Dill and Capers

Comments
This was inspired by a recipe I found on foodtv.com.  Sadly, the recipe was lacking a lot of direction, so the recipe you see here is my interpretation of what the recipe I found was asking me to do.  This had a lot of interesting flavors in it that are all fairly strong on their own, but surprisingly enough everything worked very well once brought together in the dish.   It makes 6 good-sized portions, so I’ll be enjoying this later during the week for lunches.  It’s quite a bit lighter tasting that 3 cups of half and half would lead you to believe.

Internet - Food TV

Cheater Greens

Ingredients
12 ounces center-cut bacon, cut into 12” pieces
1 green garlic head, including stalk, chopped (about 3 tablespoons) OR equal amount of garlic
8-10 cups turnip greens, chopped (Can be made with any tender greens.)
Kosher salt and freshly ground black pepper, to taste

Instructions
1. Heat a large skillet over medium heat.  Add bacon to skillet and sauté until most of the fat is rendered but the bacon is not yet crisp.  

2. Add garlic and turnip greens, increase heat to medium-high.  Sauté until greens are just wilted, stems should be crisp.  

3. Season with a generous pinch of salt, black pepper, and serve.  

Note: Any combination of onion, garlic, or shallots would work well for this dish.  Green garlic is young garlic that looks similar to a green onion and can be used in the same manner.  I used it because it’s what I had on hand; feel free to use what you have on hand.  

Cheater Greens

Comments
Having never had turnip greens before, I asked around for advice on what to do with them.  “Sauté with bacon and onions” seemed to be the prevailing advice, so I opted to go for that this first time.  While these were delicious, Lance feels that they were a cheat due to the bacon fat and I happen to agree with him, hence the name of the recipe.  I’ll admit that I find greens to be a bit scary, so I erred on the side of bacon.  

If you wanted a non-cheating method, you could reduce the bacon to only a few strips, drain the fat after sautéing the bacon, cut out the bacon all together and use olive oil, or any other method of getting fat (and flavor) into the pan that suits your dietary desires.  In the future, I will probably make turnip greens with fewer strips of bacon and drain some of the fat off before adding the greens.  

That all being said, did I mention that these were amazingly delicious?

Shown here with Crunchy Buttermilk-Coconut Chicken Fingers and Buttermilk Drop Biscuits.

Person - Gwen

Chicken Dijon

Ingredients
1 tablespoon olive oil
12 onion, chopped
1 clove garlic, minced
3-4 boneless, skinless chicken breasts (about 1 12 pounds), cut into 1-inch strips
Dash salt
Dash black pepper
1 cup chicken broth
2 tablespoons Dijon mustard     

Instructions
1. Heat the olive oil in a non-stick skillet over medium heat. Add the onion and cook until tender, about 4 minutes.

2. Turn the heat up to medium-high. Season the chicken with salt and pepper.  Add garlic and chicken to the skillet. Sauté the chicken until it is golden brown on all sides, about 4-6 minutes.

3. Add the chicken broth and stir with a wooden spoon to release any bits that are stuck to the pan. Cook until the chicken broth has reduced by half. Stir in the mustard.

4. Serve with rice.

Chicken Dijon

Comments
I found this recipe on FoodFit while I was looking up the recipe for Honey Roasted Chicken.  It looked like it had the potential to be tasty and it was.  I did modify it slightly so that we’d have a saucier finished product to serve with rice.  The flavor was great and the dish was extremely simple to prepare.

Shown here with Parmesan-Roasted Broccoli.

Internet - FoodFit

Mexican Chocolate Pudding

Ingredients
2 tablespoons cornstarch
3 cups half and half
3 egg yolks
18 teaspoon salt
2 tablets Mexican drinking chocolate (I use Ibarra brand, anything similar would work, I’m sure)
2 teaspoons vanilla extract

Instructions
1. In a large heavy-bottomed saucepan, gradually whisk together cornstarch, half-and-half, egg yolks, and salt.  

2. Cook over medium-high heat, whisking constantly, until the pudding starts to thicken.  Turn the heat down to medium and switch to stirring with a heat-resistant spatula.  

3. When the pudding is thick (around 200*F on an instant-read thermometer) remove it from the heat.  

4. Add chocolate tablets.  They’ll fall apart in the hot pudding so just keep stirring until the chocolate is fully melted, the sugar is dissolved, and the pudding is smooth.  

5. Strain the pudding into a large bowl and stir in vanilla.  Press plastic wrap directly onto the surface of the pudding so that it won’t form a skin on top.  Refrigerate until cold.  Serve with whipped cream or berries, as desired.  

Mexican Chocolate Pudding

Comments
I ran across this recipe online and it went into my “Untried Sweets” folder.  I’ve got quite a few recipes in there and I’ve made it my goal to start cooking sweets more often so I can actually make the delicious recipes I’ve saved.  Of course I didn’t plan for this when I went grocery shopping, so Mexican Chocolate Pudding was the only recipe I had all the ingredients I needed on hand.  

Mexican chocolate is sugary and spicy with cinnamon.  I find it delicious.  I’d never made pudding from scratch before and this worked very well!  It thickened up well, the texture was great.  Lance, apparently, is not so much of a fan of Mexican chocolate so he took one bite and passed his bowl to me.  If you happen to have Mexican drinking chocolate hanging around, like I did, I suggest giving this a try.

Unknown