Recipes

Perfect Pecan Pie

Ingredients
Pie Shell for Pecan Pie (recipe follows)
6 tablespoons unsalted butter, melted
1 cup dark brown sugar, packed
12 teaspoon salt
3 large eggs
34 cup light corn syrup
1 tablespoon vanilla extract
3 cups pecans, toasted and roughly chopped

Instructions
1.  Adjust oven rack to center position and heat oven to 275*F. Place pie shell in oven if not already warm.

2.  Mix butter, sugar and salt in medium bowl with wooden spoon until butter is absorbed. Beat in eggs, then corn syrup and vanilla. Return bowl to skillet of hot water; stir until mixture is shiny and warm to the touch, about 130*F. Remove from heat; stir in pecans.

3. Pour mixture into warm shell; bake until center feels set yet soft, like gelatin, when gently pressed. 50 to 60 minutes. Transfer to pie rack; let cool completely, at least 4 hours. Serve pie at room temperature or warm, with lightly sweetened whipped cream or vanilla ice cream if desired.

Note: Toast pecans in a dry skillet or in the oven while baking the pie shell.  

Pie Shell for Pecan Pie
Ingredients
1 14 cups all purpose flour, plus extra for dough and surface
2 tablespoons powdered sugar
12 teaspoon salt
8 tablespoons unsalted butter, chilled and cut into 14-inch pats
2 tablespoons vegetable shortening, frozen solid and cut into small pieces
1 large egg white, chilled and mixed with ice water to equal 14 cup
1 large egg yolk, beaten with 18 teaspoon water

Instructions
1. Mix flour, sugar, and salt in food processor fitted with steel blade. Scatter butter and shortening over dry ingredients and pulse until mixture resembles coarse cornmeal. 10 to 15 seconds. Turn mixture into medium bowl.

2. Sprinkle egg white mixture over flour mixture and, with blade of rubber spatula, use folding motion to mix. Press down on dough with broad side of spatula until dough sticks together. Shape dough into ball with hands, and then flatten into 4-inch disk. Dust dough lightly with flour, wrap tightly in plastic wrap, and place in refrigerator for at least 1 hour or up to 2 days.

3. Roll dough on lightly floured surface into 13-inch circle and transfer to 9-inch pie pan, preferably glass. Press dough into corners and sides of pan, being careful not to stretch dough. Trim edges of dough to make 12-inch overhang. Tuck overhanging dough under so that folded edge is flush with rim of pan. Flute edge.

4. Chill shell until firm, about 1 hour. Prick sides and bottom with fork and line entire shell with heavy-duty aluminum foil, pressing foil firmly against shell and extending it over fluted rim. Prick foil with fork and return shell to refrigerator while oven is heating.

5. Adjust oven rack to center position and heat oven to 400*F. Bake, pressing once or twice with mitt-protected hands, if necessary, to flatten any puffing, until crust is firmly set, about 15 minutes. Remove foil and continue to bake until bottom begins to color, about 10 minutes longer. Remove from oven, brush sides and bottom with egg yolk, and return to oven until yolk glazes over, about 1 minute longer.

Pecan Pie

Comments
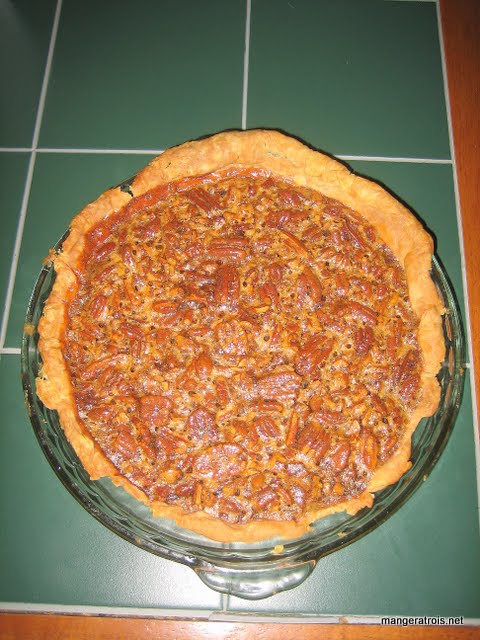
Once upon a time, I needed to find a recipe for the best pecan pie in the world to make for a friend’s birthday.  This is that recipe.  Even Art, who dislikes pecan pies because they’re always just “a thin layer of pecans over treacle,” gobbles this up when I make it for Thanksgiving.  My friend also loved the pie so I considered the whole experiment a great success. 

The crust is time-consuming but very well worth the effort of making it.  After the crust is made, it’s pretty quick to come together.  I think I’ve gotten better at making the crust look pretty, this picture is from the first time I made the recipe.  

I believe that the initial recipe came from an issue of Cook’s Illustrated.  The original recipe recommends a glass pie plate and I’ve had great success with sticking to glass.  Since it is a time-consuming recipe, I tend to make two at a time.  They also travel very well via airplane.

Cook’s Illustrated 1995

Pattypan Squash Fritters

Ingredients
Oil for frying
4 eggs
1 cup half-and-half, or other dairy that you have on hand
4 cups pattypan squash
2 teaspoons vegetable oil
2 cups flour
2 teaspoons baking powder
2 teaspoons salt

Instructions
1. Shred squash using grater, mandolin, or food processor.  

2. Heat 12 inch of oil in a large, deep skillet.  

3. Beat the eggs, milk and oil into the squash in a large bowl, then add the flour, baking powder and salt and mix until combined.

4. Drop tablespoons of batter into hot oil.  Cook until browned on one side, flip with a spatula, and cook until brown on the other side.  

5. Remove from skillet and drain.  Continue to cook fritters in batches until done.  

6. Serve with Horseradish Sauce once drained.  

Patty Pan Fritters

Comments
I found this recipe on Recipezaar while searching for a way to use the bounty of pattypan squashes I bought at the Farmer’s Market.  Art was sad that he missed Tempura Pattypans the other week, so I promised him that I’d find a similar recipe for him to enjoy.  I served these with Horseradish Sauce and they were gobbled up.  This would work equally well with zucchini or other summer squashes. This recipe made enough to feed 4-6 people and is easy to halve if you are feeding fewer people.

Shown here with Horseradish Sauce.

Internet - Recipe Zaar

Horseradish Sauce

Ingredients
14 cup mayonnaise
2 tablespoons butter, melted
1 tablespoon prepared horseradish
1 tablespoon onion, minced
14 teaspoon salt
14 teaspoon dry mustard
1 pinch crushed red pepper flakes

Instructions
1. Combine all ingredients; stir well. Chill 3 to 4 hours.

Horseradish Sauce

Comments
This recipe is from Recipezaar and I found it while looking for something to serve with Pattypan Squash Fritters.  It’s got a very strong flavor, yet isn’t exceedingly horseradishy.  A little bit goes a long way and it complimented the fritters perfectly.  

Shown here with Pattypan Squash Fritters.

Internet - Recipe Zaar

Cucumber Yogurt Sauce

Ingredients
3 small cucumbers
12 tablespoon kosher salt
2 cups yogurt (Greek is best.)
2 sprigs fresh dill, chopped
1 12 tablespoons chopped fresh mint leaves
3-4 cloves garlic, minced
12 teaspoon ground cumin
18 teaspoon freshly ground black pepper

Instructions
1. Grate the cucumber on the wide holes of a grater, mandolin, or food processor.  Put it in a colander in a large bowl or sink and sprinkle with 12 tablespoon of kosher salt. Let drain for about 20 minutes.

2. Press the cucumber with your hands to get rid of some of the moisture and place in a medium mixing bowl.

3. Add the yogurt, dill, mint, garlic, cumin and pepper. Stir together and spoon into a serving bowl.

Note: You can also just put everything into your food processor and let it rip.  

Cucumber Yogurt Sauce

Comments
This is modified from a Ted Allen recipe to go along with the most amazing lamb burgers.  It makes about 3 cups of sauce and I’m still trying to figure out what to do with the extras.  Like most things with cucumber, it has a very summery refreshing taste.  

Shown here with Lamb Burgers and Falafel.

Internet - Food TV

Lamb Burgers

Ingredients
1 tablespoon olive oil
1 12 pounds ground lamb
1-2 cloves garlic, minced
12 tablespoon capers, well drained and rinsed
1 teaspoon dried parsley or 1 tablespoon fresh parsley, chopped
1 teaspoon lemon zest
2 teaspoons mustard
1 teaspoon kosher salt
14 teaspoon freshly ground black pepper

Instructions
1. Heat olive oil in a large skillet over medium-high heat.

2. In a large mixing bowl, combine ground lamb, garlic, capers, parsley, zest, mustard, salt and pepper.  Mix well and form into 3 burger patties.  

3. Brown the burgers for about 2 minutes on each side.  Then turn the heat down to medium and cook another 5 minutes per side for medium.  

4. Serve on buns, or not, with desired toppings and Cucumber Yogurt Sauce.  

Lamb Burgers

Comments
This recipe is from Ted Allen and modified for large burgers instead of sliders.  Art declared it the best burger in his life, which is pretty high praise.  It was extremely flavorful and the Cucumber Yogurt Sauce complimented the flavors of the burgers perfectly.  

Shown here with Cucumber Yogurt Sauce and Falafel.

Internet - Food TV

Spaghetti with Tomatoes, Chives, and Basil

Ingredients
14 cup extra-virgin olive oil (Lemon and garlic olive oils both work nicely!)
5-6 cloves garlic, minced
1 pint small tomatoes
12 cup fresh chives or garlic chives, chopped
20 fresh basil or lemon basil leaves, finely shredded
Salt and freshly ground black pepper
1 pound spaghetti

Instructions
1. Bring 6 quarts of water to a boil and add 2 tablespoons of salt.

2. In a large skillet (12 to 14-inch), heat the olive oil over high heat until almost smoking. Add the garlic, tomatoes, chives, and basil and cook over high heat until the tomatoes are just beginning to burst. Season with salt and pepper.  

3. Meanwhile, cook the spaghetti in the boiling water according to package directions. Drain the pasta and add it to the pan with the tomatoes. Toss over high heat for 1 minute and serve immediately.  

Spaghetti with Tomatoes, Chives and Lemon Basil

Comments
I received Lemon Basil in my CSA box this week and, having never had it before, I had no idea what to do with it.  I found the recipe this is based upon at epicurious.com and it, in turn, is from Mario Batali’s Babbo Cookbook.  I’ve tried many of Batali’s (recipes and have always had great results.  I’m pleased to say that this was no different and absolutely fantastic.  I’m not sure I noticed a huge difference between lemon basil and regular basil, so I might try this again in the future with regular basil, but it was delicious regardless.  It was also extremely easy to toss together and that is always a plus!

Shown here with Baked Pesto Chicken.

Babbo

Chicken Breasts with Balsamic Vinegar and Garlic

Ingredients
Salt and pepper, to taste
2 tablespoons all purpose flour
3-4 boneless, skinless chicken breasts
1 pound mushrooms, sliced
2 tablespoons olive oil
6 cloves garlic, minced
14 cup balsamic vinegar
34 cup chicken broth
1 bay leaf
14 teaspoon dried thyme
1 tablespoon butter

Instructions
1. Season the flour with salt and pepper and dredge the chicken breasts in the flour mixture. Heat oil in a skillet over medium high heat and sauté the chicken until it is nicely browned on one side (about 3 minutes).

2. Turn the chicken breasts and scatter the mushrooms and garlic over the chicken breasts. Continue frying, shaking the skillet and stirring the mushrooms. Cook for about 3 minutes, and then add the vinegar, broth, bay leaf and thyme. Cover tightly and simmer over medium low heat for 10 minutes, turning after 5 minutes.

3. Transfer the chicken to a serving platter and cover to keep warm. Continue simmering the sauce, uncovered, over medium high heat for about 7 minutes or until reduced. Swirl in the butter and discard the bay leaf. Pour this mushroom sauce mixture over the chicken and serve.

Chicken Breasts with Balsamic Vinegar and Garlic

Comments
Sometimes I find myself cooking in other people’s kitchens.  Sometimes these kitchens aren’t well stocked and I don’t want to end up buying lots of things that will never get used.  This recipe has become my go-to recipe in situations like that.  It only requires one skillet, ingredients that will be completely used by the recipe, balsamic vinegar and thyme.  It also goes very well with rice which is easy to prepare and takes about the same amount of time as the chicken.  Then all you need is a salad and you’ve got a great meal.  

This recipe was passed my way by a friend when I was looking for easy things to cook in a kitchen other than my own.  It quickly became a favorite and I’d make it more often if there just weren’t so many other recipes out there to try!

Unknown

Cabbage and Potato Gratin with Sage

Ingredients
1 pound potatoes (I used new potatoes and Yukon gold depending on what I have.)
1 12 pound cabbage
Salt and freshly ground black pepper
4 tablespoons unsalted butter
3 tablespoons sage, chopped
2-3 cloves garlic, chopped
1 13 cups half and half or milk
3 eggs
12 cup Parmesan cheese, grated

Instructions
1. Preheat the oven to 350*F. Lightly butter an 8x12-inch baking dish. Bring water to a boil in a large pot while you prepare the vegetables. Slice the potatoes 14-inch thick; core and slice the cabbage into 1-inch ribbons.

2. Add 1 tablespoon salt to the water, add the potatoes, and boil until nearly tender, about 6 minutes. Scoop them into a colander, then add the cabbage to the pot and cook for 5 minutes. The water may not return to a boil and that’s fine. Drain the cabbage, rinse under cool water, and then twist in a kitchen towel or spin in a salad spinner to remove the excess moisture, getting it as dry as you can.  Combine the cabbage and potatoes in a bowl.

3. Melt the butter in a small skillet with the sage and garlic over medium heat. Cook for about 1 minute until everything is fragrant. Pour it over the cabbage and potatoes. Toss well and season with salt and pepper. Transfer mixture to the baking dish.

4. Whisk the remaining ingredients together, pour them over the vegetables, and bake until firm and lightly browned, about 50 minutes. Let cool for at least 10 minutes, then cut into pieces and serve.  

Cabbage and Potato Gratin with Sage

Comments
This is adapted from Local Flavors which is a fantastic cookbook.  I chose this recipe to use up the cabbage and potatoes that were in my CSA box this week.  I was also thrilled to be able to use local eggs and sage from my herb garden in the dish!  

I loved the flavor of this.  It was a bit different than other gratins I’ve had due to the eggs, it was almost more like a crustless quiche than a gratin.  Regardless, it was fantastic and I’m sure I’ll be making this again at some point in my life.  

I used half and half since it’s what I happened to have on hand, any milk, cream, or mixture would work just as well.

Shown here with Slow Cooker Roasted Chicken with Crispy Skin.

Local Flavors

Loaded Egg Salad

Ingredients
12 eggs
1 teaspoon baking soda
12 ounces center-cut bacon
1 bunch green onion, sliced or chopped
1 pint grape tomatoes, quartered
12 cup mayonnaise
1 teaspoon dried mustard
Salt and freshly ground black pepper, to taste

Instructions
1. To hard-boil eggs: Place eggs in a large pot. Add water to cover by two inches. Add baking soda. Bring water to a boil and boil for 12 minutes. Immediately remove pot from heat, pour off hot water, and cool eggs with cold water and ice. Once cool, peel and chop.

2. Slice bacon into 12-inch pieces and fry until crisp in a skillet over medium heat. Drain well.

3. Combine all ingredients and stir well to combine. Adjust seasonings to taste. Chill for a few hours to allow flavors to meld before serving.  

Egg Salad

Comments
I love egg salad, but I’ve never been a huge fan of egg salad that is just mayo, mustard and egg.  Art also has a dislike of mayo-heavy foods, so this salad was born from attempts to find something everyone would enjoy.  It’s very easy to modify based on your own likes and dislikes as well as what you’ve got in the house.  Avocado, tuna fish, celery, ham… add what you like and remove what you don’t.  

I’ve always had problems peeling eggs.  Not too long ago I ran across a YouTube video of a guy who boils eggs, removes a bit of shell at the top and bottom of the egg, and then simply blows the egg out of the shell.  The trick is to use baking soda.  While I never managed to get the egg to blow out, I have found them infinitely easier to peel if I boil them with baking soda.

Person - Gwen

Roasted Filet or Tenderloin of Beef

Ingredients
1 filet of beef (about 5 pounds), well trimmed and tied (a.k.a. whole filet mignon)
2 tablespoon olive oil
1 12 teaspoon salt
1 teaspoon ground black pepper

Instructions
1. Position a rack in the center of the oven. Preheat the oven to 425*F. Lightly oil a roasting pan. If you have a v-rack, this would be a good time to use it.  

2. Pat filet dry. Rub oil over meat and then season liberally with salt and pepper.   

3. Place the tenderloin in a shallow roasting pan and roast until an instant-read thermometer inserted in the thickest part of the roast reads 120*F for rare, 125* to 130*F for medium-rare, or 135* to 140*F for medium, 25 to 45 minutes (the temperature will continue to rise 5* to 10* out of the oven). Cover the roast loosely with aluminum foil and let stand for 15 to 20 minutes. Remove the strings and cut the tenderloin into thin slices.  

Roast Filet

Comments
I live near an amazing butcher and we always try to stock up on filet mignon when it goes on sale.  While steaks are lovely, a roast filet is a great alternative.  This recipe is from the 1997 Joy of Cooking, the cookbook that got me through the first 3 years of my adult life.  This recipe is actually the first one I made with meat after several years of vegetarianism.  

I was reminded of this recipe the last time I bought filet mignon.  I had needed one cut up for steaks, but it was on sale so I asked Art to get a second one trimmed for roasting to go into the freezer.  That way we could roast it, cut it for steaks ourselves, or whatever we decided to do with it.  Another customer heard Art order “filet trimmed for roasting” and expressed curiosity about how that was achieved.  She’d only ever had filet in steak form.  I told her about the process and how delicious and tender the meat turned out and, the whole time, I wished that I had this recipe posted so I could direct her to my site.  

And now it is posted!  If you’re ever looking for a good alternative to “slab o’ meat,” this is a great one.  You can easily use a smaller roast, it will just cook more quickly.

Shown with Cabbage and Potato Gratin with Sage.

Joy of Cooking (1997)